
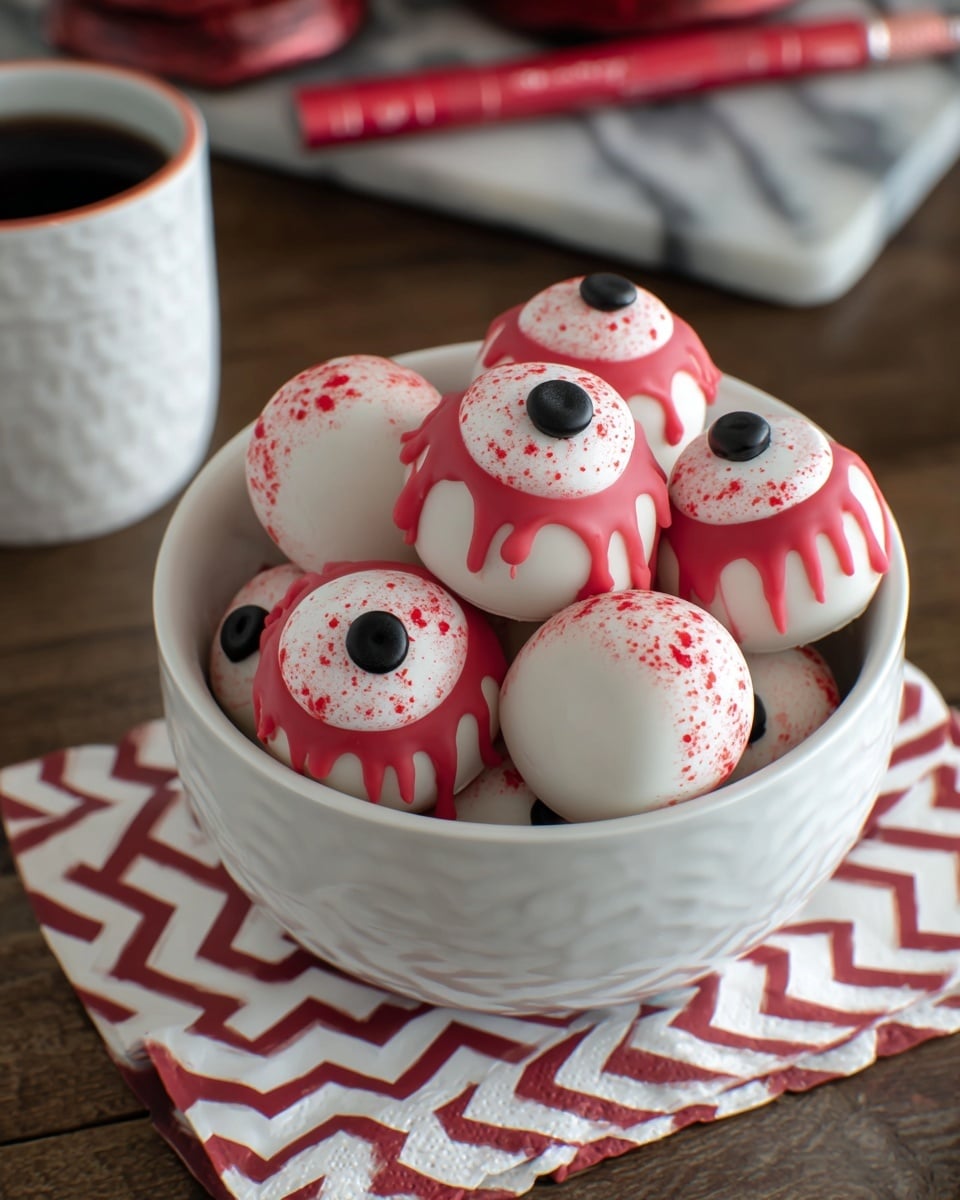
If you’re looking for a fun and spooky treat this fall, you’ve gotta try my ***Halloween Eyeballs Recipe***. These creepy-cute peanut butter eyeball truffles are a total crowd-pleaser, and honestly, they’re just as delicious as they are adorable. Whenever I make these, my family goes crazy for them—they’re great for parties, school events, or just a festive snack when you want to impress without spending hours in the kitchen. Stick around because I’m sharing all my tips and tricks to make these perfect and stress-free!
Why You’ll Love This Recipe
- So Easy and Quick: You’ll whip these eyeball truffles up in under an hour, making them perfect for last-minute Halloween fun.
- Delicious Flavor Combo: The creamy peanut butter mixed with marshmallow creme and powdered sugar hits that sweet-and-savory spot every time.
- Eye-Catching Presentation: These eyeballs look spooky and professional but require minimal effort, so you wow your guests with zero stress.
- Family Favorite: Kids and adults alike adore these, making them a versatile recipe for any Halloween gathering.

Ingredients You’ll Need
The ingredients for this Halloween Eyeballs Recipe come together beautifully to create a creamy, sweet filling coated in smooth white chocolate—perfect for grabbing attention (and taste buds!). Most of these are pantry staples, and a few seasonal touches make all the difference.
- Unsalted butter: Softened and creamy butter provides richness without making the eyeballs greasy.
- Creamy peanut butter: This adds that classic nutty flavor and helps with the dough’s texture. Make sure it’s smooth for easy mixing.
- Marshmallow creme: Gives these eyeballs a subtle fluff and sticky sweetness that holds everything together.
- Vanilla extract: A splash enhances the flavors without overpowering them.
- Table salt: Just a pinch balances the sweetness and deepens the peanut butter taste.
- Powdered sugar: Helps create a soft dough with just the right amount of sweetness and structure.
- White candy melting wafers: These coat the eyeballs with a smooth, stickable white chocolate “skin” that sets perfectly.
- Red sparkle gel: Adds a fun, creepy bloodshot effect, making the eyeballs look extra spooky and eye-catching.
- Large candy eyes: These are the star of the show—choose good-quality ones to stick nicely and look realistic.
Variations
I love playing around with this Halloween Eyeballs Recipe depending on the crowd and occasion—feel free to customize to your taste. Small tweaks can make a big difference, and you might discover a new favorite version for your spooky celebrations.
- Nut-Free Version: I once made these with sunflower seed butter instead of peanut butter for a nut-free option, and they turned out fantastic—great for school parties with allergies.
- Chocolate Coating: Sometimes I switch from white candy wafers to milk or dark chocolate melts for a richer, less sweet eyeball, which my older kids adore.
- Spicy Twist: Adding a tiny pinch of cinnamon or cayenne to the dough gives these spooky treats a surprising kick that pairs well with the peanut butter.
- Vegan Adaptation: Using vegan butter and marshmallow fluff substitutes can easily make this recipe plant-based without losing flavor or texture.
How to Make Halloween Eyeballs Recipe
Step 1: Whip Up the Creamy Peanut Butter Dough
Start by beating together your softened butter, creamy peanut butter, marshmallow creme, vanilla extract, and a pinch of salt until smooth and creamy—this step is key for a silky texture. I use my stand mixer for this, but a sturdy hand mixer works great too. Once it’s combined nicely, slowly sift in the powdered sugar while mixing on low speed. You want the dough soft enough to roll into balls but not sticky.
Step 2: Roll and Chill the Eyeball Centers
Roll the dough into 36 even-sized balls. I like using a small cookie scoop to keep them uniform, which makes the dipping stage easier. Place them on a wax paper-lined tray and pop them into the fridge for at least 30 minutes. This chilling firm-ups the dough so the coating can stick well.
Step 3: Dip in White Chocolate and Add Details
Meanwhile, melt your white candy wafers according to the package directions—either in short bursts in the microwave or using a double boiler. Grab one peanut butter ball at a time with a toothpick and dip it fully into the melted chocolate, letting any excess drip off. Place back onto a lined tray and cover the toothpick hole with a dab of more white chocolate to seal it up.
Now for the fun part—using red sparkle gel, squeeze a small circle on top of each dipped ball to create a bloodshot effect. Immediately place a candy eye on top and gently press so it sticks. With a toothpick, drag a little red gel down the sides to add creepy veins. Let these set completely before moving or serving.
Pro Tips for Making Halloween Eyeballs Recipe
- Use a Cookie Scoop for Uniformity: This makes rolling balls quicker and more consistent in size, which helps them dip evenly.
- Chill, Chill, Chill: Don’t skip the refrigeration step before dipping—it makes the balls firmer and prevents melting or cracking.
- Work Quickly with the Eyes and Gel: Adding candy eyes right after dipping ensures they stick perfectly, and the gel won’t dry before you can create your bloodshot effect.
- Keep the Melting Chocolate Smooth: Stir often and be gentle when melting to avoid lumps or overheating the candy wafers.
How to Serve Halloween Eyeballs Recipe
Garnishes
I like to sprinkle a tiny pinch of edible glitter or a little cocoa powder on the serving tray for an extra spooky shimmer. Sometimes I arrange the eyeballs on a bed of fake cobwebs or green shredded paper to complete the Halloween vibe. These touches make the eyeballs pop visually—plus, they’re fun to do with the kids!
Side Dishes
These Halloween eyeballs go perfectly with other seasonal snacks like caramel apples, pumpkin spice popcorn, or even simple cut veggies with a festive hummus dip. They’re great as a sweet finish to a Halloween-themed snack spread.
Creative Ways to Present
For a party, I’ve placed these eyeballs inside hollowed-out mini pumpkins or served them in small glass jars with dark candy “spiders” crawling around. Another fun idea I tried was skewering a few eyeballs onto colorful sticks and sticking them upright in a foam base covered with moss or black tissue paper to create a creepy eyeball bouquet!
Make Ahead and Storage
Storing Leftovers
I usually keep leftover eyeballs in a loosely covered container at room temperature or in the fridge if it’s warm. They hold their texture really well for several days—I’ve had them still taste fresh and creamy up to a week later, though you might want to bring them back to room temp before serving.
Freezing
If you want to make these ahead of time for a big event, they freeze beautifully! Just arrange the eyeballs on a baking tray to freeze solid first, then transfer to an airtight container or freezer bag. Thaw overnight in the fridge before serving for best results. I discovered this trick years ago, and it saves so much stress!
Reheating
These eyeballs are best served chilled or at room temperature, so I don’t recommend reheating. If your white chocolate layer gets a little dull after storage, gently warming the entire batch for just a few seconds in the microwave (working in short bursts) can revive their shine—just be careful not to melt the candy eyes.
FAQs
-
Can I use natural peanut butter for the Halloween Eyeballs Recipe?
You can use natural peanut butter, but since it’s often oilier and less smooth, it might affect the consistency of the dough. You might need to adjust by chilling the mixture longer or adding a little extra powdered sugar to firm it up.
-
What’s the best way to melt white candy wafers without them seizing?
Melting in short 20-30 second bursts in the microwave and stirring in between helps prevent overheating. Alternatively, use a double boiler to gently melt the wafers. Avoid adding water or steam near the chocolate, as moisture causes it to seize.
-
How do I make sure the candy eyes stick well?
Place the candy eye on the melted white chocolate right after dipping each ball, while the coating is still wet. Gently press down to set, and use a little white chocolate or red gel around the edges if needed for extra adhesion.
-
Can I make this Halloween Eyeballs Recipe gluten-free?
Absolutely! All the main ingredients are naturally gluten-free, but double-check your candy eyes and melting wafers to ensure they have no gluten-containing additives.
-
How long do these Halloween eyeballs last?
Stored properly in a loosely sealed container at room temperature or in the fridge, these eyeballs stay fresh for up to a week. Just be sure they’re kept away from heat and strong odors.
Final Thoughts
This Halloween Eyeballs Recipe is truly one of my favorite festive treats—not only because they look so spooky and fun, but because they come together with surprising ease and taste incredible. I love how versatile they are and how easily you can customize them for your own party vibe. Give this recipe a try and watch your guests’ eyes light up (pun totally intended). Trust me, you’ll be thrilled with how professional and delicious these turn out!
Print
Halloween Eyeballs Recipe
- Prep Time: 45 minutes
- Cook Time: 10 minutes
- Total Time: 55 minutes
- Yield: 35 eyeballs
- Category: Dessert
- Method: No-Cook
- Cuisine: American
Description
Create spooky and delicious Halloween Eyeballs made with a creamy peanut butter filling coated in white candy melts and decorated with candy eyes and red sparkle gel for a fun festive treat perfect for Halloween parties.
Ingredients
Filling
- 6 tablespoons unsalted butter, softened
- ½ cup creamy peanut butter
- ¼ cup marshmallow creme
- ½ teaspoon vanilla extract
- pinch of table salt
- 2 cups powdered sugar
Coating and Decoration
- 1 – 10 ounce bag white candy melting wafers
- 1 – 2 ounce tube red sparkle gel
- 35 large candy eyes
Instructions
- Prepare the filling: Beat together the softened butter, creamy peanut butter, marshmallow creme, vanilla extract, and a pinch of salt until the mixture becomes smooth and creamy.
- Add powdered sugar: Gradually incorporate the powdered sugar into the peanut butter mixture, mixing continuously until a soft, dough-like consistency forms that can be rolled into balls.
- Form peanut butter balls: Roll the peanut butter dough into 36 even-sized balls. Place them on a tray lined with wax paper and refrigerate for at least 30 minutes to firm up.
- Melt the candy wafers: Melt the white candy melting wafers according to package instructions, usually by microwaving in intervals, stirring until smooth.
- Dip the balls in coating: Using a toothpick, carefully dip each chilled peanut butter ball into the melted white chocolate coating, ensuring full coverage. Place the coated balls back onto the wax paper-lined tray.
- Seal the toothpick hole: Cover the hole from the toothpick by applying a little more melted white chocolate on the spot. Let the coating set completely.
- Decorate with eyeballs: Squeeze a small circle of red sparkle gel on top of each coated ball. Immediately place a candy eyeball on the gel and gently press down to adhere.
- Create red veins: Use a toothpick to drag the red gel from the eyeball down the sides of each truffle to mimic bloodshot veins. Allow the decorations to set thoroughly.
- Storage: Once set, store the Halloween eyeballs in a loosely sealed container at room temperature or in the refrigerator until ready to serve.
Notes
- Ensure the peanut butter is creamy for the smoothest filling texture.
- Refrigerating the peanut butter balls before dipping prevents them from falling apart during coating.
- If you don’t have white candy wafers, white almond bark or melting chocolate can be used as a substitute.
- These treats are best consumed within 3-4 days for optimal freshness.
- Handle the dipped eyeballs carefully until the coating is fully set to avoid smudging the design.
Nutrition
- Serving Size: 1 eyeball (approx. 30g)
- Calories: 120
- Sugar: 15g
- Sodium: 60mg
- Fat: 6g
- Saturated Fat: 3g
- Unsaturated Fat: 2.5g
- Trans Fat: 0g
- Carbohydrates: 16g
- Fiber: 1g
- Protein: 2g
- Cholesterol: 10mg


