
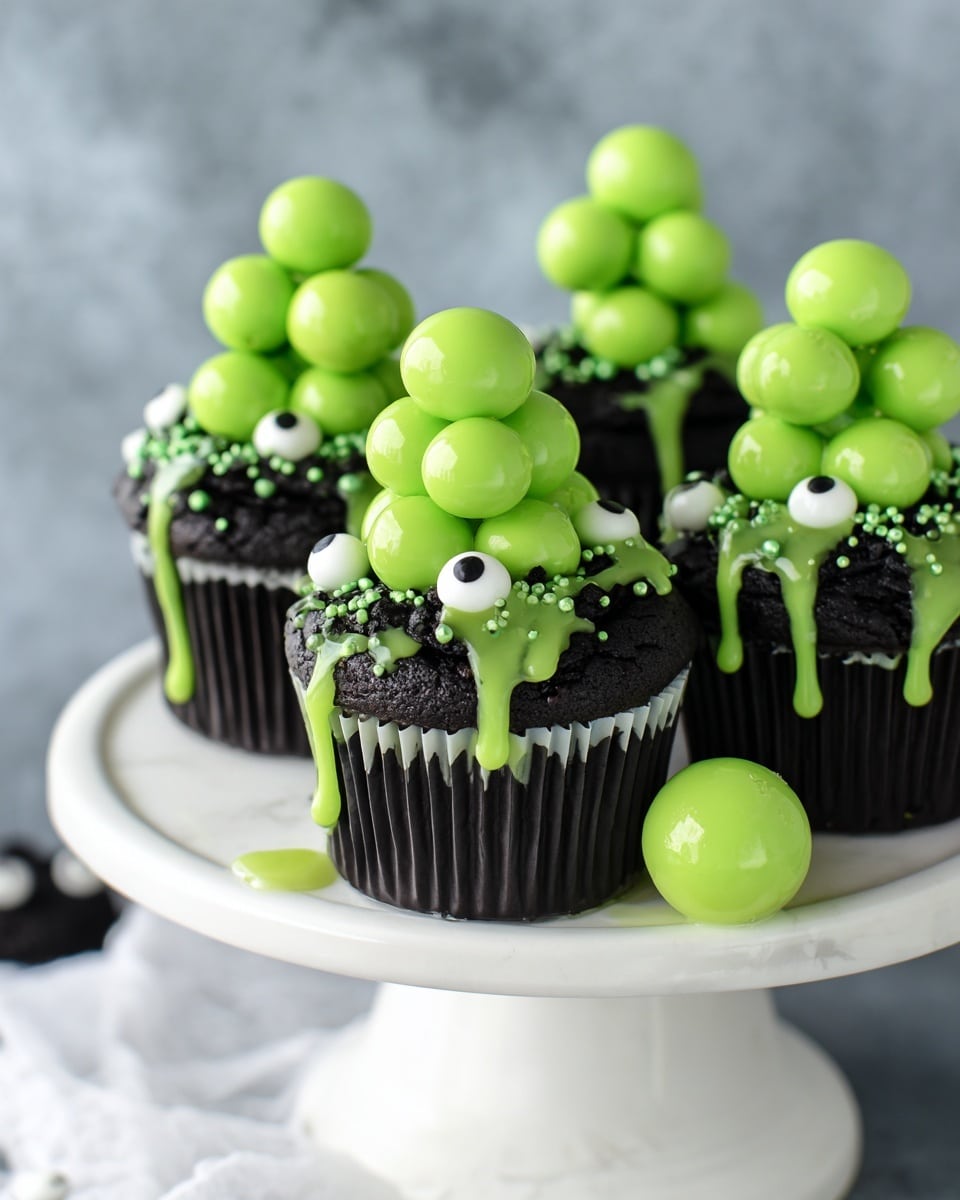
If you’re looking to wow at your next party or just want to treat yourself to something delightfully spooky yet delicious, I’ve got you covered with my Witch’s Cauldron Cupcakes with Chocolate Sphere Decorations Recipe. I absolutely love how these cupcakes combine rich dark chocolate with bubbling buttercream and those magical, glossy chocolate spheres that look just like potions bubbling in a witch’s cauldron. You’ll find that making these at home is way easier than you think, and the compliments? Oh, they just keep coming!
Why You’ll Love This Recipe
- Visual Showstopper: Those chocolate spheres look like real cauldron bubbles—your friends won’t believe you made them yourself!
- Deep Chocolate Flavor: The dark chocolate cupcakes are moist and rich, balancing perfectly with the sweet, slightly spicy black buttercream.
- Fun and Interactive: Assembling the chocolate spheres feels like a little kitchen magic trick, and it’s so satisfying to see them pop onto the cupcakes.
- Perfect for Any Occasion: Whether it’s Halloween or just a witches’ night in, these cupcakes bring a playful vibe that’s sure to delight all ages.

Ingredients You’ll Need
The magic really starts with choosing quality ingredients that complement each other. The dark chocolate in the cupcakes adds depth without overpowering, and the Wilton green candy melts give you those fantastic, glossy chocolate spheres. If you want the best results, grab fresh baking essentials and don’t substitute the chocolate melts!
- Dark Chocolate: Use a good-quality dark chocolate for a rich, decadent cupcake base.
- Willton Green Chocolate Candy Melts: These melt smoothly and give you the perfect color for the spooky chocolate spheres.
- Butter (unsalted): Adds moisture and helps the cupcakes fluff up beautifully.
- Epidure or Food Coloring: For the black buttercream, making it richly dark and dramatic.
- Heavy Cream: Makes the buttercream silky and easy to pipe.
- Flour, Sugar, Baking Powder: The baking basics that make these cupcakes rise and stay tender.
Variations
I like to switch things up depending on the occasion or what I have on hand—this recipe is super flexible! You can get creative with colors and even flavors, which makes it a party favorite every time.
- Spiced Cupcakes: I once added a pinch of cinnamon and chili powder for a little fiery kick—it was surprisingly delightful with the chocolate spheres.
- Vegan Version: Swap butter for coconut oil and use a flax egg instead, plus vegan chocolate melts; the texture stays wonderfully moist.
- Different Colors: Play with candy melts in purple or blue for colorful cauldrons – kids love customizing their cupcakes this way!
- Alcohol-Infused Buttercream: Add a splash of Irish cream or brandy for a grown-up twist that still keeps the spooky vibe.
How to Make Witch’s Cauldron Cupcakes with Chocolate Sphere Decorations Recipe
Step 1: Prepare Your Dark Chocolate Cupcakes
Start by preheating your oven and lining your cupcake tin with paper liners. I love using dark chocolate here because it gives that deep, slightly bitter note that contrasts perfectly with the sweet buttercream. Mix your dry ingredients in one bowl — flour, sugar, baking powder, and a pinch of salt — and wet ingredients in another, including melted butter and dark chocolate that you’ve gently warmed. Slowly combine wet and dry, stirring until smooth but don’t overmix, or you risk dense cupcakes. Bake for about 18–22 minutes or until a toothpick comes out clean. Trust me, getting the texture right is key; I’ve learned to let them cool completely before frosting to avoid melty buttercream.
Step 2: Make That Mysterious Black Buttercream
Fresh buttercream is what takes these cupcakes from cute to creepy-cool. I whip softened unsalted butter with powdered sugar until fluffy, then add just enough heavy cream for a pipeable texture. The trick I discovered: use a tiny drop of black gel food coloring rather than liquid, so your buttercream stays vibrant without watering down. It’s easier than you think and pipes like a dream! I usually chill the frosting for 15 minutes before swirling it on to hold close to the “cauldron” look.
Step 3: Create the Chocolate Sphere Decorations
Now, this is where the fun “potion bubbles” come alive. Melt your Wilton green chocolate candy melts in short bursts in the microwave, stirring between each until smooth and lump-free. Using a teaspoon, fill each cavity of your half-sphere silicone mold—make sure to spread the chocolate up the sides for a nice shell. A quick cake scraper swipe will flatten the tops perfectly. I learned that chilling these in the freezer for 10 minutes helps the spheres pop out cleanly without cracking. Then, gently warm your pan and press two halves together with the smooth side down to create a perfect sphere. Don’t worry about a little excess—wipe it off gently with your fingers for a flawless look. These spheres make all the difference and bring that cauldron bubbling to life on top of your cupcakes.
Step 4: Assemble Your Witch’s Cauldron Cupcakes
Pipe your black buttercream into a rounded “cauldron” shape atop the cooled cupcakes, then nestle a few chocolate spheres on top for the bubbling effect. I like to stagger the sizes and sometimes add a sprinkle of edible glitter for a magical shimmer. It’s such a crowd-pleaser to see those glossy green spheres perched like bubbles ready to pop. Don’t rush—letting the buttercream set slightly makes decorating so much easier.
Pro Tips for Making Witch’s Cauldron Cupcakes with Chocolate Sphere Decorations Recipe
- Perfect Chocolate Melting: Microwave your candy melts in short bursts and stir thoroughly—this prevents seizing and gives you glossy, smooth spheres.
- Avoid Overmixing Cupcake Batter: I learned that a gentle fold helps keep cupcakes tender and airy instead of tough and dense.
- Use Gel Food Coloring for Buttercream: It packs more pigment and won’t make your frosting too runny, which keeps your “cauldron” shape sharp.
- Chill Your Chocolate Spheres Well: Quick freezing helps them pop out without cracking—skip this step and you’ll be chasing broken pieces instead of bubbling spheres!
How to Serve Witch’s Cauldron Cupcakes with Chocolate Sphere Decorations Recipe
Garnishes
I typically keep garnishes minimal so the chocolate spheres shine, but a sprinkle of edible glitter or tiny black sugar pearls work wonders. Sometimes, placing a little “witch’s hat” candy or green-tinted sugar crystals around the base adds just enough spooky charm without overpowering the main feature.
Side Dishes
My go-to pairing is a warm cup of spiced apple cider or a dark berry punch — the fruit acidity cuts through the richness while keeping the fall witchy vibe going. For parties, I sometimes have a small cheese platter or spiced nuts nearby to balance the sweetness.
Creative Ways to Present
One of my favorite presentation tricks is to place the cupcakes on a vintage black tiered stand decorated with faux spider webs or mini cauldrons filled with dry ice for that smoky, mystical effect. A rustic wooden board sprinkled with green sugar crystals mimics moss, making the cauldron cupcakes look like they just bubbled up from a forest potion!
Make Ahead and Storage
Storing Leftovers
I like to store these cupcakes in an airtight container in the fridge, especially because of the buttercream and delicate chocolate spheres. Just make sure they’re kept cool to prevent the spheres from melting or the frosting from getting too soft. They stay fresh for about 3 days—you can totally keep the magic alive for a few days without any sacrifice in taste or texture.
Freezing
Freezing is a great option if you want to prep in advance. I freeze the cupcakes and buttercream separately—wrap each cupcake tightly in plastic wrap and place in a freezer-safe container. The chocolate spheres are best added fresh after thawing for that perfect snap, but you can freeze them too if you’re careful. When thawing, move them to the fridge overnight to avoid condensation ruining your decorations.
Reheating
Because these are cupcakes, reheating isn’t usually necessary, but if you want to bring cupcakes back to room temp after refrigeration, leave them out for about 20 minutes before serving. Avoid microwaving as it may melt the chocolate spheres. For a warm treat, I’ve gently warmed the cake portion before adding fresh frosting and spheres—works like a charm!
FAQs
-
Can I make the chocolate spheres ahead of time?
Absolutely! You can make the chocolate spheres a day or two ahead. Just keep them in an airtight container at room temperature or in the fridge, depending on your climate, to prevent melting or humidity ruining their shine.
-
What if I don’t have a half-sphere mold?
If you don’t have a silicone half-sphere mold, you can try making little drops of melted candy melts on parchment paper for simple chocolate “bubbles,” though they won’t be perfectly hemispherical. For the best effect, investing in the molds is worth it—they’re great for many other desserts too!
-
How can I prevent my buttercream from being runny?
Use chilled butter, add powdered sugar gradually, and avoid adding too much liquid at once. Using gel food coloring helps keep the consistency thick and ideal for piping the cauldron shape.
-
Can I substitute the dark chocolate cupcakes for vanilla?
Definitely! While dark chocolate complements the spooky theme perfectly, vanilla cupcakes work as a sweeter, lighter alternative and give you a blank canvas for colorful decorations.
Final Thoughts
When I first tried making the Witch’s Cauldron Cupcakes with Chocolate Sphere Decorations Recipe, I was blown away by how stunning and fun these little treats are. They’re the perfect blend of whimsical and delicious—plus, the hands-on creation of those perfect green chocolate bubbles feels like a little magical kitchen experiment every time. Whether it’s for Halloween, a mystical-themed party, or just because you want to impress your friends, I can’t recommend this recipe enough. I hope you enjoy making and sharing these cupcakes as much as I do—promise, you’ll be the star of the show!
Print
Witch’s Cauldron Cupcakes with Chocolate Sphere Decorations Recipe
- Prep Time: 20 minutes
- Cook Time: 10 minutes
- Total Time: 30 minutes
- Yield: 12 chocolate spheres (enough to decorate 12 cupcakes)
- Category: Cupcakes, Cupcake Decorations
- Method: No-Cook
- Cuisine: American
- Diet: Vegetarian
Description
These Witch’s Cauldron Cupcakes feature rich dark chocolate cupcakes topped with black buttercream and decorated with whimsical green chocolate spheres made from Wilton Chocolate Candy Melts. The candy spheres are formed using half-circle molds and assembled into bubbling cauldron bubbles, adding a fun and spooky touch perfect for Halloween or themed parties.
Ingredients
Chocolate Spheres
- Green Wilton Chocolate Candy Melts – about 1 cup
Equipment
- Small half-circle silicone mold
- Cake scraper
- Small saucepan
Instructions
- Melt the Chocolate: Melt the green Wilton chocolate candy melts in the microwave for 30 to 40 seconds, then stir thoroughly until the chocolate is smooth with no lumps.
- Fill Molds: Using a teaspoon, scoop about a teaspoon of melted chocolate into each cavity of the half-circle silicone mold. Be sure to lift the chocolate up the sides evenly to form half spheres. Repeat until all the molds are filled.
- Level the Chocolate: Take a cake scraper and pull it across the top of the molds to create flat, even surfaces on each filled half sphere.
- Set the Chocolate: Let the molds sit at room temperature for 20 to 30 minutes or place them in the freezer for about 10 minutes until the chocolate is firm. Carefully pop the half spheres out of the molds.
- Heat Pan: Warm a small saucepan over medium heat until it becomes very warm to the touch, but not smoking hot.
- Assemble Spheres: Working with two half spheres at a time, place one half sphere open side down on the warm pan for less than a second to soften the chocolate. Then immediately press the two halves together to form a full sphere. Wipe away any excess melted chocolate with your fingers and let them dry.
- Attach Full Spheres: To stick assembled full spheres together, briefly warm one whole sphere in the pan and press the melted area against another sphere to create clusters for decorating.
- Decorate Cupcakes: Place the finished chocolate spheres on top of frosted dark chocolate cupcakes to resemble bubbling cauldrons.
Notes
- Do not overheat the chocolate melts to avoid burning; microwave in short bursts and stir well.
- If the chocolate spheres crack when removing from molds, chilling them longer may help.
- Work quickly when assembling spheres as the chocolate will harden fast once removed from the heat.
- The chocolate spheres can be made ahead and stored in an airtight container at room temperature.
- This technique works with any candy melts color to customize cupcakes for different occasions.
Nutrition
- Serving Size: 1 cupcake with decoration
- Calories: 280 kcal
- Sugar: 25 g
- Sodium: 150 mg
- Fat: 15 g
- Saturated Fat: 9 g
- Unsaturated Fat: 5 g
- Trans Fat: 0 g
- Carbohydrates: 32 g
- Fiber: 2 g
- Protein: 3 g
- Cholesterol: 25 mg


