
If you’re hunting for a treat that’s both spook-tacular and irresistibly delicious, you’re going to love this Easy Decorated Halloween Cupcakes Recipe. I absolutely adore how these cupcakes come alive with fun, festive designs, yet they’re surprisingly straightforward to make — perfect whether you’re baking for a party, family, or just because you want to celebrate the season with something sweet and creative. Stick around because I’ll walk you through every step, and by the end, you’ll have a batch of cupcakes that look amazing and taste even better!
Why You’ll Love This Recipe
- Fun & Festive: These cupcakes bring Halloween to life with cute and spooky decorations that anyone can master.
- Simple But Stunning: I discovered this trick to use basic piping techniques with gel food coloring for amazing results.
- Perfect for All Skill Levels: Whether it’s your first time decorating or you’re a pro, you’ll enjoy how approachable this recipe is.
- Make-Ahead Friendly: I share tips on how to prep these ahead without losing that fresh, vibrant look.

Ingredients You’ll Need
These ingredients are a perfect harmony for making cupcakes that are moist, flavorful, and can hold up to vibrant, colorful frosting decorations. I always suggest using good-quality unsalted butter and fresh vanilla extract—it makes a huge difference in your buttercream’s flavor!
- Pumpkin cupcakes: You can use a homemade pumpkin cupcake recipe or your favorite boxed mix jazzed up with pumpkin puree.
- Unsalted butter: Room temperature is key for smooth frosting; avoid melted or cold butter.
- Confectioners’ sugar: It’s fine if you sift it twice to avoid lumps in your buttercream.
- Heavy cream (or half-and-half): Adds richness and creaminess to the frosting, but room temperature only.
- Vanilla extract: Pure always—adds that warm, comforting flavor that ties everything together.
- Gel food coloring: These are essential for those bold, bright Halloween hues without thinning your frosting.
- Piping bags and tips: Small star tips and round tips help create different textures and effects with your frosting.
- Candy eyeballs and mini Oreos: Fun accents that bring the monsters and spiders to life!
- Optional sprinkles: Add a little extra festive sparkle where you see fit.
Variations
I love that this recipe is super flexible. Once you get comfortable with the basic decorating techniques, you can make it your own by swapping colors, using different flavors, or going full DIY on decorations. Play around — that’s half the fun!
- Flavor swaps: I sometimes add a dash of cinnamon or nutmeg to the buttercream for an extra cozy fall vibe that pairs beautifully with pumpkin cupcakes.
- Dietary modifications: Use dairy-free butter and milk alternatives to make these cupcakes vegan-friendly without sacrificing taste or texture.
- Design variations: My kids love turning the monsters into zombies or witches by adding little fondant hats or using different candy eyes.
- Less intimidating decorating: If you’re short on time, pipe simple swirls and add candy eyeballs or sprinkles for instant spooky vibes.
How to Make Easy Decorated Halloween Cupcakes Recipe
Step 1: Prepare the Vanilla Buttercream
This step is the heart of your decorating success. I like to beat the butter first until it’s super creamy—it takes about 2 minutes on medium speed. Don’t rush or skip this because a well-beaten butter base makes your frosting smooth and fluffy. Then, you gradually add the sugar and cream, beating on low at first (to avoid a sugar cloud in your kitchen!), then on medium-high for a couple of minutes. Taste it—you can add a tiny pinch of salt if it tastes too sweet. I always do! If you spot bubbles in your frosting, grab a spatula and gently push the frosting against the bowl’s side for a minute or two to pop them—trust me, it makes a noticeable difference.
Step 2: Tint Your Frosting for the Halloween Designs
Divide the frosting into separate bowls depending on how many colors you’re using—usually around 4 or 5. I love mixing Fuchsia and Violet gel colors to get the perfect purple for the monsters; it’s my little secret! Add gel coloring drop-by-drop and stir well until you reach that spooky perfect shade. If the color looks too bright, adding just a tiny touch of black gel can tone it down beautifully. Remember, colors get a bit darker as the frosting rests, so keep that in mind when mixing.
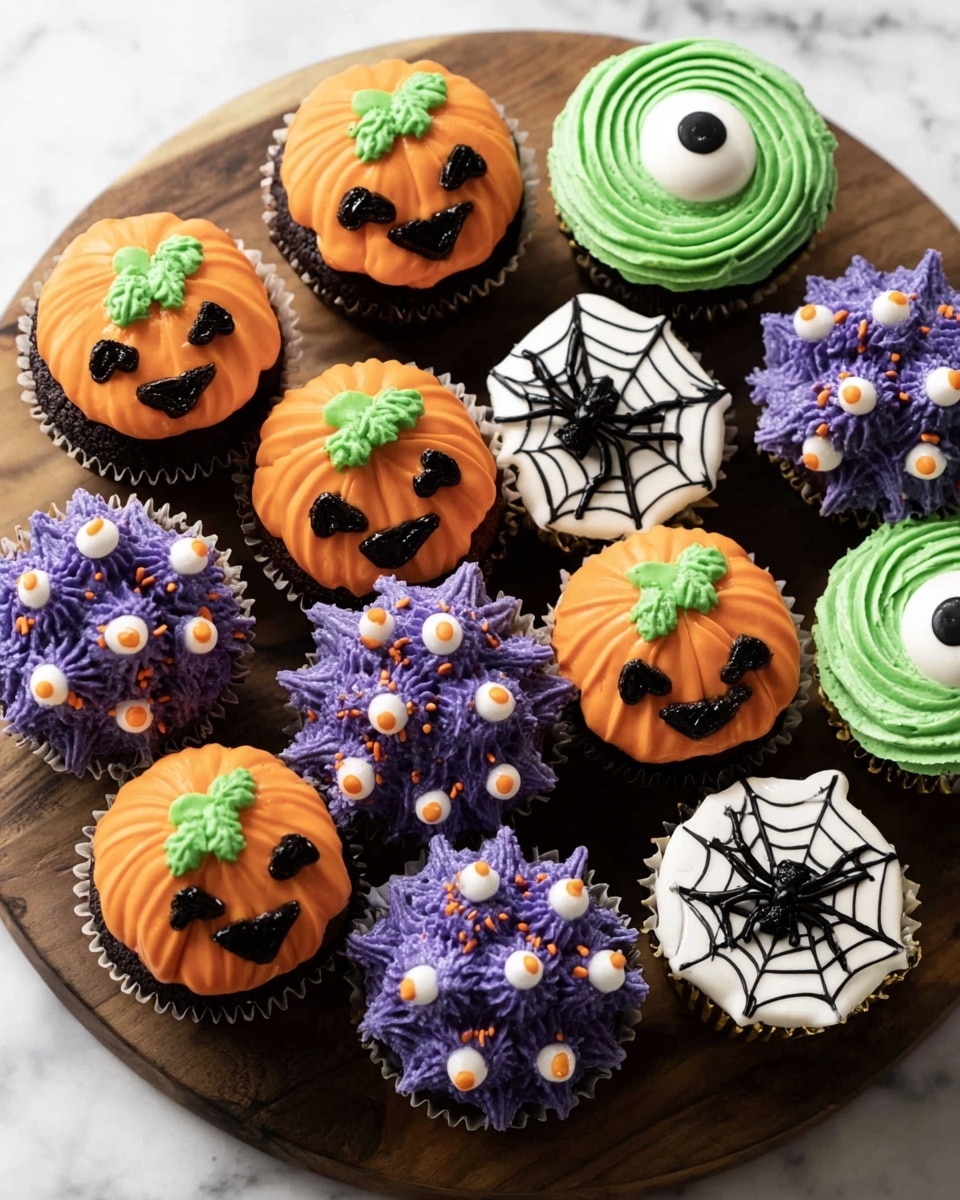
Step 3: Pipe Your Monster Cupcakes
The green monster is surprisingly easy because you pipe a simple spiral with a small star tip, then plop on one big candy eyeball right in the center—it always gets a laugh! For the purple monster, I like piping lots of tiny stars covering the whole cupcake and then nestling in small candy eyeballs. Sprinkles add a fun extra touch. You’ll find that the piping motion flows better once you get into a rhythm, so take your time and enjoy it.
Step 4: Create Jack-o’-Lantern Cupcakes
This one is a bit more involved but totally worth it. Start by piping vertical orange lines on the cupcake to mimic pumpkin ridges, then add a little green stem on top with the star tip. The black frosting is perfect for drawing goofy or spooky faces—get creative! These cupcakes always bring a smile, and you might find everyone asking how you made those perfect lines.
Step 5: Make the Spider Cupcakes
These are my personal favorite because of how cute the Oreo spiders look. You start by smoothing white frosting all around, then pipe the black web using criss-cross lines and curved connectors to make the spider web. I usually position half of a mini Oreo cookie “spider” right on top and add little black legs and eyes with black frosting and candy eyeballs. If you tell your family or guests this story behind the “spider,” it usually becomes a crowd favorite!
Pro Tips for Making Easy Decorated Halloween Cupcakes Recipe
- Don’t Rush the Buttercream: I learned the hard way that under-beaten butter makes your frosting lumpy, so give it a good 2 minutes until silky smooth.
- Use Gel Food Coloring: Liquid colors can thin your frosting—gel colors keep it thick and bright, which really helps when piping detailed designs.
- Practice Piping on a Plate: Before you tackle the cupcakes, try piping some shapes on parchment paper to build confidence and control.
- Store Decorated Cupcakes Properly: Avoid covering these right after decorating to keep candy eyes from running; uncovered at room temp works best for a few hours.
How to Serve Easy Decorated Halloween Cupcakes Recipe
Garnishes
I usually keep it simple and just add the candy eyeballs and mini Oreos because they create a big visual impact with minimal effort. Sometimes I sprinkle a little edible glitter or orange and black jimmies for extra sparkle, but the bold frosting colors really steal the show. If you want to jazz it up even more, tiny fondant shapes or candy pumpkins are adorable.
Side Dishes
These cupcakes shine as the sweet centerpiece, so I like pairing them with simple sides like apple cider or pumpkin spice lattes to keep with the season’s vibe. For a party, finger foods like mini sandwiches or a veggie platter balance the richness of the cupcakes beautifully.
Creative Ways to Present
One year, I arranged these cupcakes on a tiered display with faux cobwebs draped around them, and it got rave reviews! You can also serve them inside hollowed-out mini pumpkins or on autumn leaf-shaped plates for a charming seasonal touch. Little flags or themed cupcake toppers add an extra dash of personality too.
Make Ahead and Storage
Storing Leftovers
From my experience, these cupcakes keep best when stored in a cupcake carrier or airtight container in the fridge, but only after they’ve had a bit of time to set. Covering them immediately after decorating can cause the candy eyes to run, so I let them sit uncovered for a couple of hours before storing. They still taste superb up to 5 days later—perfect for enjoying a few at a time.
Freezing
I’ve frozen undecorated cupcakes successfully by wrapping them tightly in plastic wrap and then placing them in a freezer-safe bag. When you’re ready, thaw overnight in the fridge and decorate fresh for the best look. Freezing decorated cupcakes is tricky because the frosting texture changes, so I don’t recommend it unless you’re okay with a slight shift in appearance.
Reheating
Since these are best served at room temperature, I usually take refrigerated cupcakes out about an hour before serving. If you want them slightly warmer, a quick 10-second zap in the microwave can soften them—but watch closely so you don’t melt the fabulous frosting!
FAQs
-
Can I use store-bought cupcakes for this recipe?
Absolutely! Using good-quality store-bought cupcakes can save you time. Just make sure they’re completely cooled if they’re freshly baked, so the frosting holds nicely on top. This Easy Decorated Halloween Cupcakes Recipe focuses mainly on the decoration, so pre-made cupcakes are a great shortcut.
-
What if I don’t have piping bags or tips?
No worries! You can use zipper bags and snip a tiny corner to pipe your frosting. While it may not produce as detailed designs, you can still make those spooky swirls and stick on candy eyes for a fun effect. This recipe is flexible and beginner-friendly like that!
-
How do I avoid the candy eyeballs’ pupils running?
Great question! I learned that keeping decorated cupcakes uncovered at room temperature for a few hours helps pupils stay crisp. If you cover them too soon or refrigerate immediately after decorating, the candy eyes can get moist and run. Decorate as close to serving time as possible for best results.
-
Can I make the frosting ahead of time?
You can make your buttercream a day in advance and keep it refrigerated in an airtight container. Before piping, bring it back to room temperature and briefly whip it to revive that perfect texture. This saves time on the big baking day and keeps your frosting fresh and luscious.
Final Thoughts
I can’t recommend this Easy Decorated Halloween Cupcakes Recipe enough if you want to add a splash of creative fun to your holiday baking. When I first tried it, I was amazed at how approachable the decorating was, even for someone who’s a bit nervous with piping tips. Plus, the smiles on my family’s faces after tasting them made all the effort more than worth it. So grab your piping bags, channel your inner cupcake artist, and let these monsters, pumpkins, and spiders bring your Halloween celebration to life—it’s a guaranteed hit!
Print
Easy Decorated Halloween Cupcakes Recipe
- Prep Time: 45 minutes
- Cook Time: 0 minutes
- Total Time: 45 minutes
- Yield: 12 cupcakes
- Category: Dessert
- Method: No-Cook
- Cuisine: American
- Diet: Vegetarian
Description
Celebrate Halloween with these easy and fun decorated Halloween cupcakes featuring four spooky designs: Green and Purple Monster Cupcakes, Jack-o’-Lantern Cupcakes, and Spider Cupcakes. Made with moist pumpkin cupcakes and topped with creamy vanilla buttercream dyed in vibrant Halloween colors, these cupcakes are perfect for parties and festive treats.
Ingredients
Pumpkin Cupcakes
- 12 pumpkin cupcakes or your favorite cupcake recipe
Vanilla Buttercream
- 1 and 1/2 cups (340g) unsalted butter, softened to room temperature
- 6 cups (720g) confectioners’ sugar (sifted if lumpy)
- 6 Tablespoons (60ml) heavy cream, half-and-half, or whole milk, at room temperature
- 2 teaspoons pure vanilla extract
- Salt, to taste (about 1/8 teaspoon recommended)
Monster Cupcakes Decoration
- Gel food coloring: Leaf Green, Fuchsia, Violet, Super Black
- 2 piping bags and 2 couplers
- Piping tip: small open star tip (Wilton #21 recommended)
- Small candy eyeballs
- Large candy eyeballs
- Optional: sprinkles
Jack-o’-Lantern Cupcakes Decoration
- Gel food coloring: Orange, Leaf Green, Super Black
- 3 piping bags
- Piping tips: large petal tip (Wilton #125), small open star tip (Wilton #21), small round tip (Wilton #4)
Spider Cupcakes Decoration
- Gel food coloring: Super Black
- 1 piping bag
- Piping tip: small round tip (Wilton #4)
- Oreo Mini cookies
- Mini candy eyeballs
Instructions
- Make the vanilla buttercream: Using a handheld or stand mixer fitted with a paddle attachment, beat the softened butter on medium speed until creamy, about 2 minutes. Add 5 and 1/2 cups (660g) confectioners’ sugar, heavy cream, and vanilla extract. Beat on low speed for 30 seconds, then increase to medium-high speed and beat for 2 minutes. Taste and add about 1/8 teaspoon salt if frosting is too sweet. To remove air bubbles, stir by hand with a silicone spatula or wooden spoon for 1–2 minutes.
- Adjust frosting consistency: If frosting is too thin, add up to 1/2 cup (60g) more confectioners’ sugar. If too thick, add heavy cream 1 tablespoon (15ml) at a time, mixing and tasting between additions to reach desired consistency.
- Tint the frosting: Divide frosting into separate bowls for each color needed. Use gel food coloring to tint each bowl, stirring well. Keep one bowl white for spider cupcakes. Use combinations like Fuchsia + Violet to create custom shades. Add black gel coloring in tiny amounts if you want to tone down brightness.
- Green Monster Cupcakes: Fit a piping bag with a small open star tip (Wilton #21) and coupler. Fill with green frosting. Pipe a spiral from the outside inward on each cupcake. Place one large candy eyeball in the center, gently pressing it onto the frosting.
- Purple Monster Cupcakes: Using a similarly prepared piping bag with purple frosting and a small open star tip, pipe stars over the entire cupcake surface. Press small candy eyeballs into the frosting, then optionally add sprinkles.
- Jack-o’-Lantern Cupcakes: Fit separate piping bags with a large petal tip (#125) filled with orange frosting, a small open star tip (#21) filled with green frosting, and a small round tip (#4) filled with black frosting. Pipe rounded vertical lines with orange frosting to mimic pumpkin ridges, pipe stems with green, and pipe eyes, nose, and mouth with black to create jack-o’-lantern faces.
- Spider Cupcakes: Spread white frosting over cupcakes with a spatula. Using a piping bag with a small round tip filled with black frosting, pipe three criss-crossing straight lines to create six triangular sections forming a spider web. Add curved connecting lines between these sections. Place half a mini Oreo cookie on the web as the spider’s body. Pipe two small black dots for eyes and place two mini candy eyeballs on these dots. Pipe four black lines on each side of the Oreo to form spider legs.
- Storage: Store decorated cupcakes uncovered at room temperature for a few hours before serving. For longer storage, cover and refrigerate leftovers up to 5 days in a cupcake carrier. Decorate cupcakes the day of serving if possible to keep candy eyes from running.
Notes
- Make Ahead: Cupcakes can be baked 1 day ahead and stored covered at room temperature. Decorate on the day of serving for best appearance.
- Electric mixer (handheld or stand) helps make smooth buttercream.
- Sift confectioners’ sugar if lumpy for best texture.
- Use heavy cream for creamiest frosting; half-and-half or whole milk also work but may reduce creaminess.
- Adjust buttercream quantity depending on how many designs you decorate; the full recipe yields about 4+ cups.
- Use piping bags and tips as specified for each design to achieve detailed decoration.
- Consider using a cupcake carrier for transporting decorated cupcakes safely.
Nutrition
- Serving Size: 1 cupcake
- Calories: 320 kcal
- Sugar: 35 g
- Sodium: 110 mg
- Fat: 18 g
- Saturated Fat: 11 g
- Unsaturated Fat: 6 g
- Trans Fat: 0 g
- Carbohydrates: 38 g
- Fiber: 1 g
- Protein: 2 g
- Cholesterol: 55 mg


