
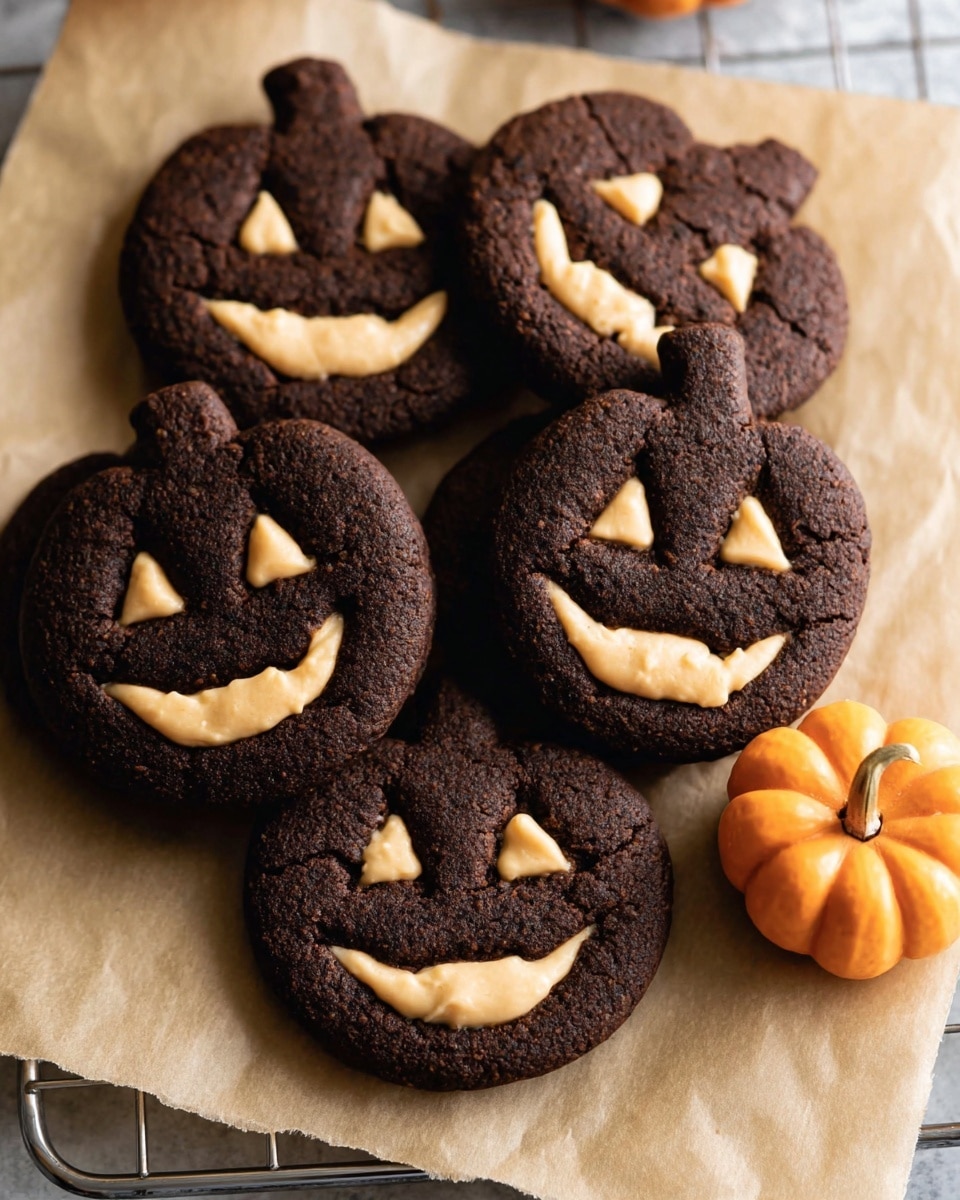
If you love Halloween treats that stand out, I’m so excited to share this fan-freaking-tastic Halloween Gluten-Free Chocolate Sugar Cookies with Peanut Butter Fluff Filling Recipe with you. These chocolatey, tender cookies sandwiched with a dreamy peanut butter fluff will quickly become your go-to for festive baking. When I first tried this recipe, I was blown away by how rich and soft the cookies turned out, and the filling? Simply irresistible. Stick around—I’m sharing all my tips and tricks to help you nail this delightful recipe in your kitchen.
Why You’ll Love This Recipe
- Gluten-Free but Delicious: You won’t sacrifice flavor or texture with these rich chocolate sugar cookies made from almond and tapioca flour.
- Peanut Butter Fluff Filling: This filling is light, creamy, and gives the perfect sweet-salty balance that takes the cookies to the next level.
- Perfect for Halloween: The cocoa powder-packed dough gives a spooky chocolate base that pairs perfectly with festive cookie cutters and decoration.
- Easy and Foolproof: With simple steps and ingredients, even if you’re new to gluten-free baking, you’ll master these cookies with ease.

Ingredients You’ll Need
This recipe uses a special combo of gluten-free flours and real, quality ingredients that come together for soft, flavorful cookies. Keep an eye out for Dutch-process cocoa powder—it gives a deeper chocolate flavor without the acidity that can affect the texture.
- Blanched Almond Flour: This gives the cookies a tender crumb and subtle nutty flavor without overpowering the chocolate.
- Tapioca Flour: Adds chewiness and helps bind everything together naturally.
- Unsweetened Dutch Process Cocoa Powder: For that rich color and intense chocolate taste without bitterness.
- Baking Powder: A touch of lift to keep the cookies light.
- Salt: Enhances the chocolate flavor and balances the sweetness.
- Unsalted Butter: Use room temperature so it creams perfectly with the sugar.
- Organic Cane Sugar or Granulated Sugar: Sweetens up the dough with a clean flavor.
- Egg Yolk: Adds richness and tenderness.
- Vanilla Extract: Always a must to deepen cookie flavor.
- Marshmallow Cream: The base for that airy peanut butter fluff filling.
- Creamy Peanut Butter: Smooth style works best to avoid oil separation in the filling.
- Pure Maple Syrup: Adds subtle sweetness and a touch of complexity.
- Salt (for filling): Balances the filling’s flavors perfectly.
Variations
One of the best parts about this Halloween Gluten-Free Chocolate Sugar Cookies with Peanut Butter Fluff Filling Recipe is how fun it is to customize. I often switch up the fillings or play with the cookie shapes to suit the occasion or my mood.
- Swap the Fluff Filling: Sometimes, I substitute the peanut butter fluff with chocolate ganache or a cream cheese frosting for a different, indulgent vibe.
- Add Spices: For a cozy fall twist, add a pinch of cinnamon or pumpkin spice to the dough – I love how subtle warmth blends with chocolate.
- Use Different Nut Butters: If peanut allergies are a concern, almond or cashew butter work beautifully in the fluff filling.
- Decorate with Icing: Once cooled, you can decorate your cookie sandwiches with gluten-free royal icing or colorful sprinkles to amp up the festive look.
How to Make Halloween Gluten-Free Chocolate Sugar Cookies with Peanut Butter Fluff Filling Recipe
Step 1: Mix the Dry Ingredients Carefully
Start by whisking together the almond flour, tapioca flour, Dutch-process cocoa powder, baking powder, and salt in a small bowl. I love this part because the cocoa powder makes the dough look spooky and rich—perfect for Halloween! Make sure your powders are well combined so the flavor and rise are even in every bite.
Step 2: Cream Butter and Sugar
Using a stand mixer with the smaller 3-quart bowl is key here—you want the butter and sugar to cream fully into a light, fluffy texture. I learned the hard way that a bigger bowl just leaves the mixture stuck on the edges! Cream the unsalted butter with sugar on medium-high speed, scraping down the sides as needed, until you get a soft and airy base.
Step 3: Add Egg Yolk and Vanilla
Next, beat in the room-temperature egg yolk and vanilla extract until the mixture looks smooth and creamy. This step adds moisture and richness, making the cookies tender but firm enough to hold their shape when baked.
Step 4: Incorporate Dry Ingredients
Sprinkle the dry ingredients over the wet mixture gradually. Start mixing on low speed to avoid a flour cloud, then bump up to medium speed until the dough comes together, starts pulling away from the bowl’s edges, and no dry streaks remain. This is a moment where patience pays off—you’ll get a dough that’s pliable but not sticky.
Step 5: Chill the Dough
Shape the dough into a disc, wrap it tightly in plastic wrap, and refrigerate for at least one hour. Chilling is my favorite secret because it firms up the dough so it’s easier to roll and helps the cookies hold their shape during baking. Plus, it deepens the chocolate flavor.
Step 6: Roll and Cut Out Your Cookies
Preheat your oven to 350°F and line baking sheets with parchment paper. I always dust my working surface with cocoa powder instead of flour to avoid weird white streaks on the cookies—that’s a simple trick I discovered early on. Roll out the chilled dough to 1/4-inch thickness (or thinner if you’re going for delicate cookie sandwiches). Use your favorite Halloween-themed cookie cutters to cut shapes, leaving room for spreading on the baking sheets.
Step 7: Bake and Cool
Bake cookies for about 8 to 9 minutes until the edges are set but the centers stay soft—not dry! This timing is perfect for soft, chewy cookies that aren’t tough. Let them cool on the baking sheet for a few minutes before transferring to a wire rack to cool completely, which prevents breakage when assembling.
Step 8: Whip Up the Peanut Butter Fluff Filling
While the cookies cool, combine marshmallow cream, creamy peanut butter, maple syrup, and a pinch of salt in a small bowl. Microwave just 15 seconds—this step helps loosen the peanut butter for easier mixing. Stir until smooth and creamy, but don’t overheat or it’ll become oily. This filling is light, fluffy, and perfectly balanced.
Step 9: Assemble Your Cookie Sandwiches
Spread about a tablespoon of the peanut butter fluff onto the bottom half of each cookie, then gently press the matching top cookie on. The filling will naturally spread to the edges and get that classic sandwich look. My family goes crazy for these—definitely double the batch if you’re feeding a crowd!
Pro Tips for Making Halloween Gluten-Free Chocolate Sugar Cookies with Peanut Butter Fluff Filling Recipe
- Use Dutch-Process Cocoa Powder: It gives a richer chocolate taste without bitterness or acidity, perfectly complementing gluten-free flours.
- Don’t Skip Chilling the Dough: Refrigeration firms up the fat and lets flavors meld for easier handling and better texture.
- Roll with Cocoa Powder: Using cocoa powder instead of flour prevents white streaks and keeps your cookies looking perfectly chocolatey.
- Handle the Filling Gently: Microwave only briefly to loosen—it should be creamy, not runny or oily.
How to Serve Halloween Gluten-Free Chocolate Sugar Cookies with Peanut Butter Fluff Filling Recipe
Garnishes
I love topping these cookie sandwiches with a sprinkle of edible glitter or a few mini chocolate chips to up the festive vibe. Sometimes, I pipe a bit of royal icing along the edges for a colorful, whimsical touch that kids adore. Freshly crushed salted peanuts on the filling edges add texture and look fantastic too.
Side Dishes
For a full Halloween-themed spread, I like pairing these cookies with a warm cup of spiced pumpkin latte or hot chocolate topped with whipped cream. They also go great with simple fresh fruit like sliced apples or orange segments to balance the richness.
Creative Ways to Present
Present your cookies arranged on a spooky-themed platter with spider web doilies or orange and black parchment paper underneath. For parties, place each cookie sandwich in clear cellophane bags tied with orange ribbons or Halloween-themed stickers—your guests will love the festive packaging and the anticipation it builds!
Make Ahead and Storage
Storing Leftovers
I store leftover cookie sandwiches in an airtight container at room temperature for up to three days. The cookies stay soft and the filling remains smooth without drying out, which is a nice bonus. If your kitchen is warm, pop the container in the fridge—but let them come to room temp before eating for the best flavor.
Freezing
You can freeze these cookie sandwiches by placing them on a baking sheet in a single layer until solid, then transferring them to a freezer bag. I freeze them without the filling first, then assemble after thawing. But if you’re in a pinch, freezing the fully assembled cookies works too—just allow extra thawing time.
Reheating
To revive cookies that have been refrigerated or frozen, I let them come to room temperature naturally, or warm gently in a low oven (about 300°F for 5 minutes). This brings back that soft, fresh-baked texture while keeping the peanut butter fluff creamy and dreamy.
FAQs
-
Can I substitute the almond flour for another gluten-free flour?
Almond flour is key to the texture and flavor in this recipe because it provides moisture and tenderness. Swapping it for other flours like rice or oat flour may dry out the cookies or change how they bake, so I don’t recommend substitutions unless you test carefully.
-
What if I don’t have a stand mixer?
You can absolutely make these cookies with a hand mixer or even by hand. Just cream the butter and sugar really well until light and fluffy, and mix the rest carefully until smooth. It’ll just take a bit more elbow grease!
-
Can I make the dough ahead of time?
Yes! The dough can be wrapped tightly and stored in the fridge for up to 2 days before rolling out and baking. This actually helps the flavors meld even more.
-
What brand of peanut butter works best for the filling?
I prefer classic creamy peanut butter like Jif because it blends smoothly without oil separation. Natural peanut butters tend to be oilier and can make the filling greasy, so stick with traditional creamy varieties for best results.
Final Thoughts
This Halloween Gluten-Free Chocolate Sugar Cookies with Peanut Butter Fluff Filling Recipe is one of those gems I’m so glad I discovered—it hits all the right notes for texture, flavor, and festivity. Every time I bake these, I’m reminded how gluten-free doesn’t have to mean compromise, and how a little peanut butter fluff can elevate any cookie. So, grab your cocoa powder and peanut butter, and give this recipe a whirl—I promise you’ll love sharing these sweet little bites with your family and friends this Halloween!
Print
Halloween Gluten-Free Chocolate Sugar Cookies with Peanut Butter Fluff Filling Recipe
- Prep Time: 30 minutes
- Cook Time: 9 minutes
- Total Time: 1 hour 39 minutes
- Yield: 12 cookies
- Category: Dessert
- Method: Baking
- Cuisine: American
- Diet: Gluten Free
Description
Delight in these Halloween Chocolate Sugar Cookies that are naturally gluten free, featuring a rich cocoa-flavored almond and tapioca flour base. Rolled in cocoa powder and baked to perfection, these tender cookies are filled with a creamy, sweet peanut butter fluff. Perfect for festive occasions, these cookies are easy to make and irresistibly tasty!
Ingredients
Gluten Free Chocolate Sugar Cookies
- ¾ cup plus 2 tablespoons blanched almond flour
- ¼ cup tapioca flour
- 2 tablespoons unsweetened Dutch process cocoa powder, plus extra for rolling
- ¼ teaspoon baking powder
- ⅛ teaspoon salt
- 2 ½ tablespoons unsalted butter, room temperature
- 6 tablespoons organic cane sugar or granulated sugar
- 1 large egg yolk, room temperature
- ½ teaspoon vanilla extract
Peanut Butter Fluff Filling
- ¼ cup marshmallow cream
- 3 tablespoons creamy peanut butter
- 1 tablespoon pure maple syrup
- 1 pinch salt
Instructions
- Mix Dry Ingredients: In a small mixing bowl, whisk together the almond flour, tapioca flour, cocoa powder, baking powder, and salt until evenly combined.
- Cream Butter and Sugar: In the bowl of a stand mixer fitted with the beater attachment (using the smaller 3-quart bowl), add the butter and sugar. Beat on medium-high speed until light and fluffy, scraping the sides as needed. Alternatively, you can use a handheld mixer for this step.
- Add Egg Yolk and Vanilla: Beat in the egg yolk and vanilla extract at medium speed until the mixture is smooth and creamy, scraping down the sides as necessary.
- Combine Wet and Dry Ingredients: Gradually sprinkle the dry ingredients over the wet mixture, starting at low speed to prevent flour from flying, then increase to medium speed. Mix until the dough is uniform with no dry streaks and starts to pull away from the bowl sides.
- Chill Dough: Transfer the dough onto a sheet of plastic wrap and shape it into a disc. Wrap tightly and refrigerate for at least 1 hour to firm up the dough for easier rolling.
- Prepare Oven and Baking Sheets: Preheat your oven to 350°F (175°C). Line two baking sheets with parchment paper.
- Roll and Cut Cookies: Lightly dust your work surface with cocoa powder to avoid white flour streaks. Place the chilled dough in the center and roll out to about ¼ inch thickness (thinner if making sandwiches). Cut into desired shapes and arrange cookies 2 inches apart on prepared baking sheets.
- Bake Cookies: Bake the cookies for 8 to 9 minutes, until the edges are set. Let cookies cool on the baking sheets over a wire rack for 5 minutes, then transfer fully to the rack to cool completely.
- Make Peanut Butter Fluff Filling: While cookies cool, combine marshmallow cream, creamy peanut butter, maple syrup, and a pinch of salt in a small bowl. Microwave for 15 seconds to soften the mixture slightly, then stir until smooth and creamy. Be careful not to overheat.
- Assemble Cookies: Spoon about a tablespoon of the peanut butter fluff onto the bottom half of a cookie, then gently press the top half on to form a sandwich. The filling will spread to the edges.
Notes
- This recipe makes approximately 12 cookies when rolled to ¼ inch thickness using standard cookie cutters.
- You can double the recipe if you want a larger batch.
- Dutch process cocoa powder is preferred for a richer, less acidic flavor compared to natural cocoa powder.
- White granulated sugar can substitute for organic cane sugar if needed.
- Use cocoa powder—not flour—to dust the rolling surface to prevent white streaks on cookies.
- Creamy traditional peanut butter is recommended over natural varieties to avoid excess oil in the filling.
- A stand mixer with a 3-quart bowl or a handheld mixer works best for creaming the butter and sugar properly.
- Cookie cutters used are linked in the original recipe for festive Halloween shapes.
Nutrition
- Serving Size: 1 cookie sandwich
- Calories: 140
- Sugar: 9g
- Sodium: 45mg
- Fat: 9g
- Saturated Fat: 3g
- Unsaturated Fat: 5g
- Trans Fat: 0g
- Carbohydrates: 13g
- Fiber: 2g
- Protein: 3g
- Cholesterol: 30mg

