
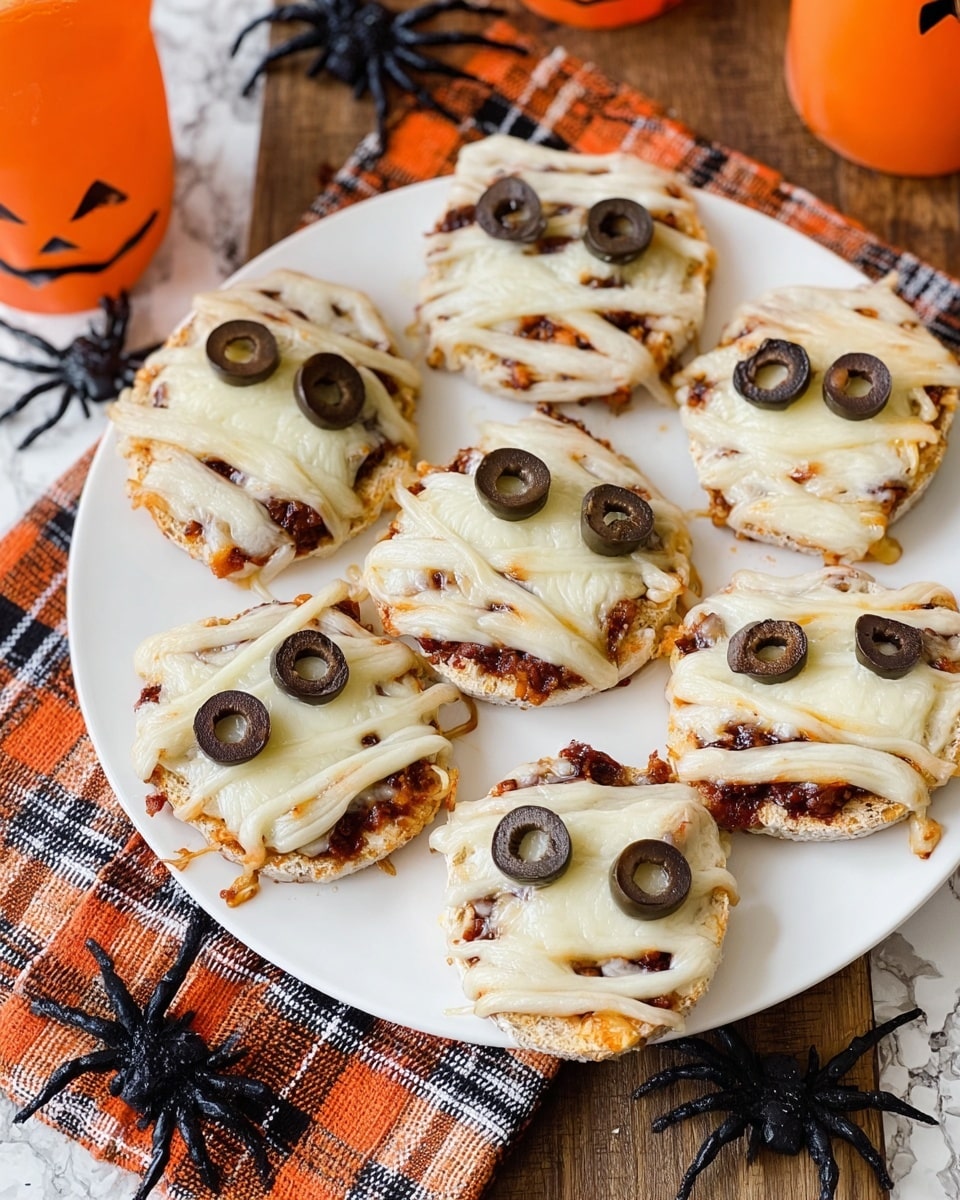
If you’re looking for a fun, spooky snack that’s super quick and irresistibly cute, this Pizza Mummies Recipe is an absolute winner. I first stumbled on it when trying to make Halloween treats that even picky eaters would enjoy, and let me tell you, it’s become a total crowd-pleaser in my house. You’ll find that these little mummies are easy to make, customizable, and best of all—they look adorable while tasting like classic pizza flavors everyone loves.
Why You’ll Love This Recipe
- Super Quick to Make: From start to finish, this recipe takes under 15 minutes, perfect when time is tight.
- Kid-Friendly Fun: The mummy design gets kids in on the fun and even encourages picky eaters to try new foods.
- Simple Ingredients: You likely already have everything in your pantry, so no last-minute shopping trips.
- Versatile & Customizable: You can tweak toppings easily to suit dietary preferences or personal flavor twists.

Ingredients You’ll Need
For this Pizza Mummies Recipe, simplicity is key, and each ingredient plays a fun, flavorful role. English muffins provide the perfect base that crisps up nicely, while mozzarella gives you that gooey, stretchy cheese factor we all love on pizza. The olives are perfect for creating spooky mummy eyes and add a salty bite that complements the pizza sauce beautifully.
- English muffins: These make a great low-effort crust, and I like to use whole wheat for a bit more texture and fiber.
- Pizza or marinara sauce: Pick your favorite brand or homemade sauce for the best flavor foundation.
- Mozzarella cheese sticks: I peel these into strings for the mummy wraps, but shredded mozzarella works in a pinch.
- Green olives with pimentos: They add just the right touch of color and a spooky eye effect—try to slice evenly for the cutest mummies!
Variations
I love how flexible the Pizza Mummies Recipe is—you can really make it your own depending on what you have at home or the flavors you prefer. Over time, I’ve tried a bunch of fun twists that make these mummy snacks even more festive or suited to different tastes.
- Meat lovers’ variation: Adding tiny pepperoni slices as mummy “eyes” or under the cheese strips gives an extra punch of flavor that my family goes crazy for.
- Vegetarian version: I swap olives with thin slices of black or sun-dried tomatoes for eye-catching, tangy bites without meat.
- Cheese swaps: When my kids weren’t big on mozzarella sticks, shredded cheddar or fontina did the trick and melted beautifully.
- Spice it up: A sprinkle of crushed red pepper or Italian herbs on top before baking adds a little savory kick.
How to Make Pizza Mummies Recipe
Step 1: Toast Your Muffin Base
Start by preheating your oven to 400°F (200°C). Then slice your English muffins in half and place them cut-side up on a baking sheet. Pop them in the oven for about 5 minutes to get them lightly toasted—this helps keep the bottoms crisp once you add the sauce and cheese. I learned the hard way that skipping this step sometimes makes the base soggy, so trust me on this!
Step 2: Spread the Sauce
When the English muffins are toasted just right, take them out and spread about one tablespoon of pizza or marinara sauce evenly over each half. This not only adds delicious flavor but also acts as glue to hold your ‘mummy wrappings’ in place.
Step 3: Peel and Arrange the Cheese “Wrappings”
Now the fun part! Take your mozzarella sticks and peel them lengthwise into thin strips resembling bandages. Carefully drape these strands of cheese all over the muffin halves in a messy, mummy-like pattern—overlapping and leaving tiny gaps for a “face.” Don’t worry about perfection here; the goal is to be playful!
Step 4: Add the Olives for Eyes
Slice your green olives into rings about 1/4 inch thick to create mummy eyes. Place two rings on each muffin half, nestled on top of the cheese strips. The shiny dark-green eyes give your mummies spooky personality immediately, and my kids love “decorating” them just how they want.
Step 5: Bake Until Melted and Gooey
Pop your assembled pizza mummies back into the oven and bake them for another 3-5 minutes, just until the cheese melts and starts to bubble. Keep a close eye to avoid burning. I like to rotate the pan halfway through for even melting. When ready, the cheese will be stretchy, the edges golden, and your mummies looking irresistible!
Pro Tips for Making Pizza Mummies Recipe
- Toast First for Crunch: I always pre-toast the English muffins to keep the base from getting soggy once the cheese melts.
- Cheese Peeling Hack: Warming mozzarella sticks in your hands slightly makes peeling into strips much easier—no snapping!
- Eye Placement Matters: Arrange olive eyes before cheese to help keep them in place while baking, especially for younger cooks.
- Watch Baking Time: Overbaking can dry out the cheese, so keep a close eye and pull them out as soon as cheese looks melty and bubbly.
How to Serve Pizza Mummies Recipe
Garnishes
Personally, I love adding a sprinkle of fresh chopped basil or a dash of dried oregano on top after baking—it adds a wonderful pop of color and classic pizza aroma. Sometimes a little drizzle of garlic butter or even a touch of hot sauce makes these taste even better. If you want to keep it kid-friendly, a light dusting of parmesan cheese gives a nice savory finish.
Side Dishes
These Pizza Mummies pair beautifully with a crisp side salad or carrot and celery sticks dipped in ranch or hummus. For an easy party spread, I often serve them alongside a bowl of marinara sauce for dipping extra cheesy bites—my family loves dunking!
Creative Ways to Present
For Halloween parties, I’ve arranged the mummies on a platter lined with shredded lettuce to look like creepy graveyard grass. Another year, I placed them around a “cauldron” bowl of sauce with dry ice fog for a spooky effect. If you’re serving kids, letting them decorate their own mummies before baking is a blast and makes the experience interactive.
Make Ahead and Storage
Storing Leftovers
I usually store any leftover mummies in an airtight container in the refrigerator—though I rarely have leftovers because they disappear fast! They keep well for up to 2 days, but the muffin base loses some crunchiness over time.
Freezing
If you want to freeze them, I recommend assembling the mummies up to step 4 (before baking), wrapping them tightly in plastic wrap, and freezing on a baking sheet until firm. Then place them in a freezer bag. When ready, bake straight from frozen—just add a couple extra minutes to the bake time.
Reheating
To reheat, I pop leftover mummies in a 350°F oven for about 5-7 minutes to revive crispness and melt the cheese again. Avoid microwaving if you can — it tends to turn the muffin base soggy and the cheese rubbery.
FAQs
-
Can I make Pizza Mummies Recipe without English muffins?
Absolutely! While English muffins are my go-to, you can substitute with small pita breads, mini bagels, or even thick slices of French bread. Just keep in mind that baking times might vary slightly depending on your base choice.
-
What other toppings work well for Pizza Mummies?
You can get creative here! Small pepperoni slices, cut bell peppers, cherry tomatoes, or even tiny mushrooms can make fun decorative details. Just remember that lightweight toppings bake best so they don’t weigh down the cheese strips.
-
How do I prevent the cheese from burning while baking?
Keep an eye on them and bake just until the cheese melts and starts to bubble. If your oven tends to be hot on top, consider lowering the rack or tenting the mummies with a sheet of foil to avoid burning.
-
Can kids help make Pizza Mummies?
Definitely! Kids love peeling the mozzarella into “bandages” and placing olive eyes. It’s a fantastic activity to get them engaged in the kitchen, and they’ll be proud to eat their own creations.
Final Thoughts
This Pizza Mummies Recipe holds a special place in my kitchen because it turns a simple snack into an imaginative experience. Whether for a festive party, a cozy family afternoon, or just a fun way to get kids excited about food, it hits all the marks—delicious, easy, and utterly adorable. Trust me, once you try these, you’ll want to make them again and again. Go ahead, get your ingredients ready, and bring a little silly, cheesy magic to your table!
Print
Pizza Mummies Recipe
- Prep Time: 5 minutes
- Cook Time: 8 minutes
- Total Time: 13 minutes
- Yield: 4 servings
- Category: Snack
- Method: Baking
- Cuisine: American
Description
These spooky and delicious Pizza Mummies are a fun and easy Halloween-themed snack perfect for kids and adults alike. Made with English muffins, pizza sauce, melted mozzarella cheese, and olive eyes, they are quick to prepare and bake to melty perfection.
Ingredients
Base
- 2 English muffins, cut in half
Toppings
- 1/4 cup pizza or marinara sauce
- 2 mozzarella cheese sticks
- 3 green olives with pimentos
Instructions
- Preheat Oven: Preheat your oven to 400℉ to ensure it’s hot and ready to bake the muffins evenly.
- Bake English Muffins: Place the English muffin halves cut side up on a baking sheet and bake for 5 minutes. This initial bake helps crisp the muffins slightly.
- Spread Sauce: Remove the muffins from the oven and spread about 1 tablespoon of pizza or marinara sauce evenly onto each muffin half.
- Add Cheese and Olives: Peel the mozzarella cheese sticks into thin strings and artistically arrange them on top of the sauce to resemble mummy bandages. Slice the green olives into 1/4 inch thick rings and place two olive slices on each muffin half to create eyes.
- Bake to Melt Cheese: Return the assembled pizza mummies to the oven and bake for 3-5 minutes more, or until the mozzarella cheese is fully melted and slightly bubbly.
Notes
- Prep Ahead: After assembling (step 4), you can cover the muffins loosely with foil and refrigerate if preparing earlier. Bake them fresh when ready to serve.
- Get Creative with Toppings: Feel free to swap the olive eyes with pepperoni slices, bell pepper pieces, or add a sprinkle of parmesan for extra flavor and a fun look.
- Cheese Variety: If mozzarella sticks are unavailable or unwanted, shred mozzarella or other mild melting cheeses instead. Be aware lower fat cheeses may not melt as well.
Nutrition
- Serving Size: 1 pizza mummy (half English muffin with toppings)
- Calories: 150
- Sugar: 2g
- Sodium: 300mg
- Fat: 6g
- Saturated Fat: 3.5g
- Unsaturated Fat: 2g
- Trans Fat: 0g
- Carbohydrates: 18g
- Fiber: 1g
- Protein: 8g
- Cholesterol: 15mg


