
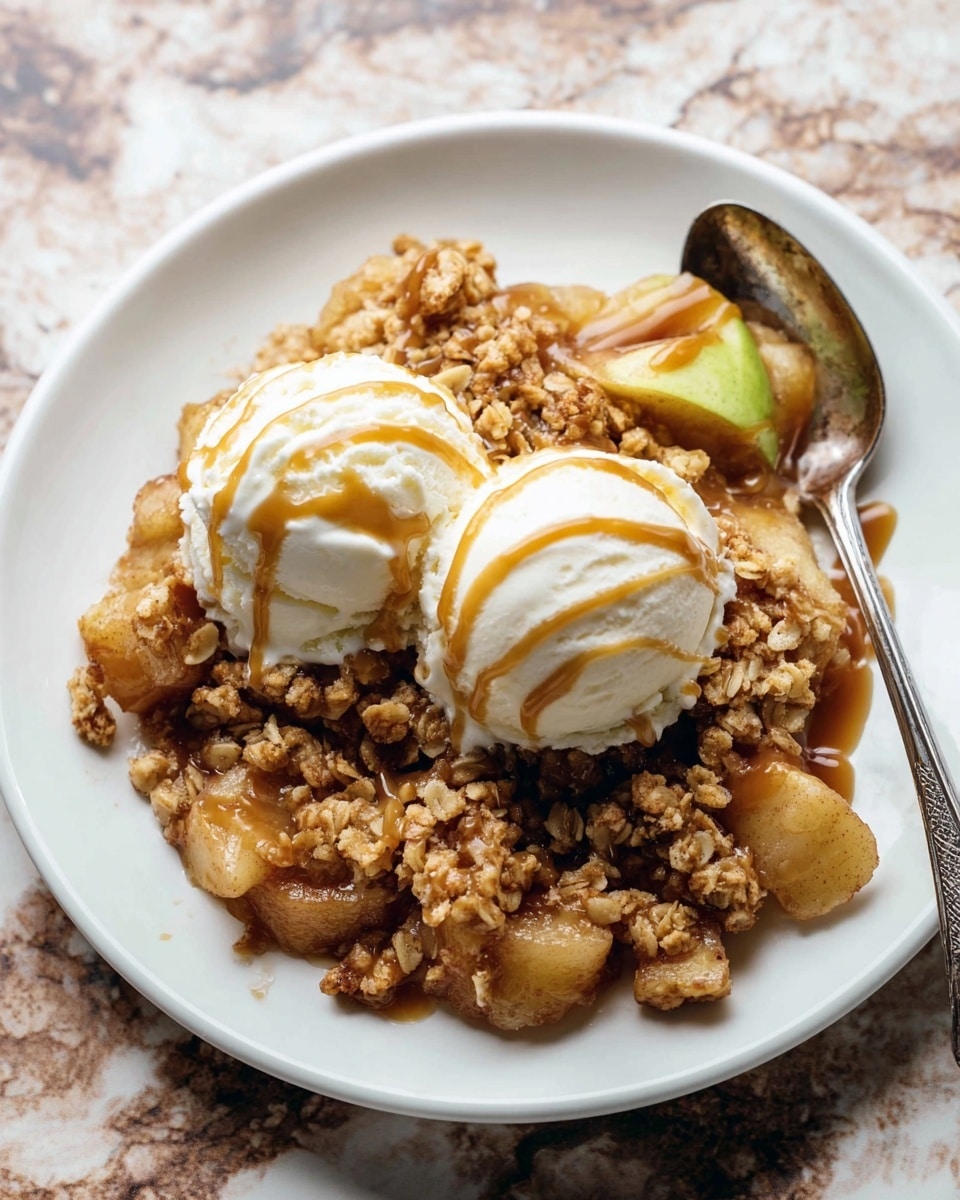
I’m so excited to share this Classic Apple Crisp Recipe with you! It’s one of those desserts that feels like a warm, cozy hug on a plate—perfect for crisp autumn evenings or any time you want a little comfort food that’s straightforward to make. I absolutely love how this apple crisp balances tart and sweet apples with a buttery, cinnamon-spiced oat topping that gets nice and crunchy in the oven.
When I first tried this recipe, I was surprised by how simple ingredients came together into something so deliciously nostalgic. You’ll find that it’s perfect for family dinners, casual get-togethers, or even just a solo treat with a scoop of ice cream. Trust me, once you make this Classic Apple Crisp Recipe, it’ll become a go-to whenever those baking cravings hit.
Why You’ll Love This Recipe
- Simple Ingredients: Most of these you probably already have on hand, making it easy to whip up anytime.
- Perfect Texture: The crunchy oat topping contrasted with tender, juicy apples is simply irresistible.
- Versatile & Crowd-Pleasing: Great solo or with ice cream, it’s always a hit at holidays and casual dinners alike.
- Make Ahead Friendly: You can prep it in advance and freeze it, which is a game-changer for busy weeknights.

Ingredients You’ll Need
This Classic Apple Crisp Recipe shines because of the balance between the apple filling and the buttery oat topping. Each ingredient plays a specific role, so I recommend sticking to the list for that perfect harmony. Plus, a few quick shopping tips will help you pick the best apples and ingredients for baking success.
- Apples: I love mixing Granny Smith with Jazz or Pink Lady—they add tartness and sweetness, which keeps the flavor dynamic.
- Brown sugar: Both light and dark brown sugars work, but dark adds a deeper, molasses-like richness.
- All-purpose flour: This gives structure both in the filling and in the topping, so it’s essential for that perfect crisp texture.
- Vanilla extract: Just a splash elevates the whole apple filling with warmth and depth.
- Ground cinnamon & nutmeg: These spices provide that timeless spiced apple goodness everyone loves.
- Salt: Essential for balancing sweetness and enhancing all the flavors.
- Butter: Use cold, unsalted butter cubed and cut into the topping for those buttery, crunchy clusters.
- Old-fashioned rolled oats: They bring texture and a wholesome feel; whole oats give the best result, but quick oats can substitute.
- Optional toppings: I highly recommend salted caramel and vanilla ice cream—they turn it into a dessert worth swooning over!
Variations
I like to mix things up once in a while to suit different moods or dietary needs, and this Classic Apple Crisp Recipe is super flexible. Don’t hesitate to customize it to fit your style—you’ll enjoy the base as much as I do, plus these little tweaks really add personality.
- Add Nuts: I often stir in chopped pecans or walnuts to the topping for a crunchy, nutty twist that my family loves.
- Gluten-Free: Substitute the flour with a gluten-free blend and use gluten-free oats to keep this delicious while meeting dietary needs.
- Spice Variations: Sometimes I add a pinch of ground ginger or cardamom for a warming, unexpected flavor note.
- Half Recipe: Making a smaller batch is easy—just halve the ingredients and bake in a smaller dish; it bakes a bit quicker too.
How to Make Classic Apple Crisp Recipe
Step 1: Prep Your Apples and Oven
Start by preheating your oven to 350°F (177°C) and lightly greasing a 9×13-inch baking dish—this size gives just the right depth for the crisp. While the oven warms up, peel and cut your apples into 1-inch chunks. I like treating the apples gently so they keep their shape but get tender while baking; aim for slices about a quarter to half an inch thick. Mixing multiple apple varieties here really makes the filling sing with flavor.
Step 2: Mix the Filling
In a large bowl, combine your apple chunks with brown sugar, flour, vanilla extract, cinnamon, nutmeg, and a pinch of salt. Stir everything well so the apples get evenly coated. The flour helps thicken the filling juices as it bakes, so don’t skip it! Once mixed, spread the filling evenly in your prepared baking dish.
Step 3: Make the Topping
Whisk together flour, brown sugar, and cinnamon in a separate bowl, then add your cold, cubed butter. Use a pastry cutter, fork, or fingertips to cut the butter into the dry ingredients until the mixture looks crumbly with pea-sized bits. Don’t rush here—those little butter pieces are what create the beautifully crispy topping. Finally, stir in the oats for that classic oat texture we crave in apple crisp.
Step 4: Assemble and Bake
Sprinkle the crumble topping evenly over the apple filling, gently pressing down so it adheres but stays crumbly on top. Bake uncovered for about 45 minutes until the topping turns a gorgeous golden brown and you can see bubbling juices peeking around the edges. Let it cool on a wire rack at least five minutes before serving to set up those juices—unless you’re like me and can’t wait to dig right in!
Pro Tips for Making Classic Apple Crisp Recipe
- Choosing the Right Apples: I’ve found that using an equal mix of tart and sweet apples keeps the filling balanced without getting mushy.
- Butter Temperature Matters: Cold butter makes the topping crumbly and flaky; don’t warm it up or melt it before mixing.
- Oats Texture Tip: Whole rolled oats give the best crispy texture, but if you’re in a pinch, quick oats work too—just don’t reduce the flour.
- Don’t Skip Resting After Baking: Waiting a few minutes lets the filling thicken so your serving isn’t watery.
How to Serve Classic Apple Crisp Recipe
Garnishes
For me, nothing beats a warm slice of apple crisp topped with a big scoop of creamy vanilla ice cream that slowly melts into the crunchy topping. Sometimes, I drizzle salted caramel sauce on top, turning this into a decadent treat that impresses any guest. Fresh mint leaves or a light dusting of powdered sugar also make lovely garnishes if you want something a little extra.
Side Dishes
I like serving this classic dessert after dinner with simple sides like a cup of hot spiced tea or rich coffee. At family gatherings, I’ve paired it alongside a cheese platter or even a scoop of homemade whipped cream for extra indulgence. If you want to keep it casual, serving it with plain Greek yogurt can balance the sweetness nicely.
Creative Ways to Present
One fun idea I tried was baking the apple crisp in individual ramekins for single servings—perfect for a dinner party or holiday brunch. You can also layer the baked crisp with yogurt and granola in tall glasses for a stunning parfait-style presentation. On special occasions, I like to top it with toasted almonds or a sprinkle of cinnamon sugar just before serving to make it extra festive.
Make Ahead and Storage
Storing Leftovers
I usually cover leftovers tightly with plastic wrap or store them in an airtight container in the fridge. The apple crisp stays moist and delicious for up to five days, making it great to enjoy as a quick snack or reheated dessert during the week.
Freezing
Freezing works wonders if you want to prep this dessert way ahead. I freeze either the unbaked crisp (then thaw overnight before baking) or the fully baked and cooled crisp, wrapped well in foil and plastic wrap. In my experience, the texture holds up beautifully for up to three months, so you’ve got a fantastic emergency dessert ready anytime.
Reheating
To reheat, I place the crisp in a 350°F oven for 15–20 minutes until warmed through and bubbly again. Avoid the microwave if you can because the topping loses its crispiness. This little extra step really freshens it up and keeps it tasting like it just came out of the oven.
FAQs
-
Can I use other fruits instead of apples in this recipe?
Absolutely! While this Classic Apple Crisp Recipe is designed for apples, you can substitute or mix in pears, peaches, or berries. Just keep in mind that different fruits may require adjustments to baking time or thickening agents due to varying water content.
-
What’s the best way to prevent the topping from getting soggy?
Using cold butter and not overmixing the topping helps it stay crumbly and crisp. Also, letting the apple filling rest to reduce excess moisture before topping can help. Finally, bake uncovered at the correct temperature so moisture evaporates properly.
-
Can I prepare this apple crisp in advance?
Yes! You can assemble the apple filling and topping, then cover and refrigerate it for up to one day before baking. This is a great time saver if you want to prep ahead but still enjoy fresh-baked crisp.
-
What type of oats should I use for the topping?
I recommend old-fashioned rolled oats for the best texture and appearance. Quick oats work in a pinch but can make the topping a bit powdery. Avoid instant oats as they tend to get mushy.
-
Can I make this recipe gluten-free?
Definitely! Use a gluten-free all-purpose flour blend and certified gluten-free oats. This swap maintains the texture and flavor wonderfully without gluten worries.
Final Thoughts
I hope you give this Classic Apple Crisp Recipe a try—it’s one of those desserts that feels like a little celebration in every bite. Whether you’re baking for yourself, your family, or to impress guests, it’s dependable, easy, and deeply satisfying. From my kitchen to yours, I promise this crisp will become one of your favorite fall traditions (or frankly, year-round indulgences!). Happy baking!
Print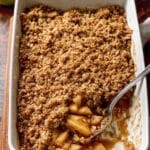
Classic Apple Crisp Recipe
- Prep Time: 15 minutes
- Cook Time: 45 minutes
- Total Time: 1 hour 5 minutes
- Yield: 8-10 servings
- Category: Dessert
- Method: Baking
- Cuisine: American
- Diet: Vegetarian
Description
This Classic Apple Crisp recipe features tender, cinnamon-spiced baked apples topped with a buttery oat crumble. It’s a comforting dessert perfect for any season, served warm or cold and optionally paired with salted caramel or vanilla ice cream for an extra indulgence.
Ingredients
Filling
- 8 medium peeled apples, cut into 1-inch chunks that are 1/4 – 1/2 inch thick (about 10 cups, or 1200g, chunks)
- 1/2 cup (100g) packed light or dark brown sugar
- 1/4 cup (31g) all-purpose flour (spooned & leveled)
- 1 teaspoon pure vanilla extract
- 1 teaspoon ground cinnamon
- 1/2 teaspoon ground nutmeg
- 1/4 teaspoon salt
Topping
- 3/4 cup (94g) all-purpose flour (spooned & leveled)
- 3/4 cup (150g) packed light or dark brown sugar
- 1 teaspoon ground cinnamon
- 1/2 cup (8 Tbsp; 113g) unsalted butter, cold and cubed
- 1 cup (85g) old-fashioned whole rolled oats
- Optional: salted caramel and vanilla ice cream for serving
Instructions
- Preheat and Prepare Baking Dish: Preheat the oven to 350°F (177°C) and lightly grease a 9×13-inch baking pan or any 3.5-4-quart baking dish to prevent sticking.
- Mix Filling: In a large bowl, combine all filling ingredients — apples, brown sugar, flour, vanilla extract, cinnamon, nutmeg, and salt. Mix thoroughly until the apples are evenly coated, then spread this mixture evenly in the prepared baking pan.
- Make Topping: In a medium bowl, whisk together the flour, brown sugar, and cinnamon. Using a pastry cutter or fork, cut in the cold cubed butter until the mixture has a crumbly texture. Stir in the rolled oats until evenly combined.
- Assemble Crisp: Sprinkle the crumbly topping evenly over the apple filling in the baking pan to cover completely.
- Bake: Place the pan in the preheated oven and bake for 45 minutes or until the topping is golden brown and the filling is bubbling around the edges.
- Cool and Serve: Remove the crisp from the oven and place it on a wire rack to cool for at least 5 minutes. Serve warm, at room temperature, or cold, optionally topped with salted caramel and/or vanilla ice cream.
- Store Leftovers: Cover any leftovers and refrigerate for up to 5 days to maintain freshness.
Notes
- Make Ahead & Freezing Instructions: The baked apple crisp freezes well for up to 3 months. Thaw overnight in the refrigerator and reheat covered at 350°F (177°C) for about 30 minutes or until hot. You can also prepare the crisp through step 3, then refrigerate it for up to 1 day or freeze the unbaked crisp for up to 3 months. Thaw before baking; baking time may be slightly longer if cold.
- Special Tools: 9×13-inch Baking Pan, Vegetable Peeler, Glass Mixing Bowl, Whisk, Pastry Cutter, Cooling Rack.
- Apples: A mix of Granny Smith and Jazz or Pink Lady apples works best for optimal balance of tartness and sweetness.
- Oats: Use old-fashioned whole rolled oats for best texture. Quick oats can be substituted 1:1, but topping will be more powdery. Do not reduce flour, or topping may turn greasy.
- Nuts: Add 1 cup chopped pecans or walnuts into the topping mixture with oats if desired.
- Half Recipe: Easily halve the recipe and bake in a 9-inch square or round dish. Reduce bake time to 30-35 minutes.
Nutrition
- Serving Size: 1 slice (approx. 1/10th of recipe)
- Calories: 320
- Sugar: 28g
- Sodium: 90mg
- Fat: 12g
- Saturated Fat: 7g
- Unsaturated Fat: 4g
- Trans Fat: 0g
- Carbohydrates: 52g
- Fiber: 4g
- Protein: 2g
- Cholesterol: 30mg


