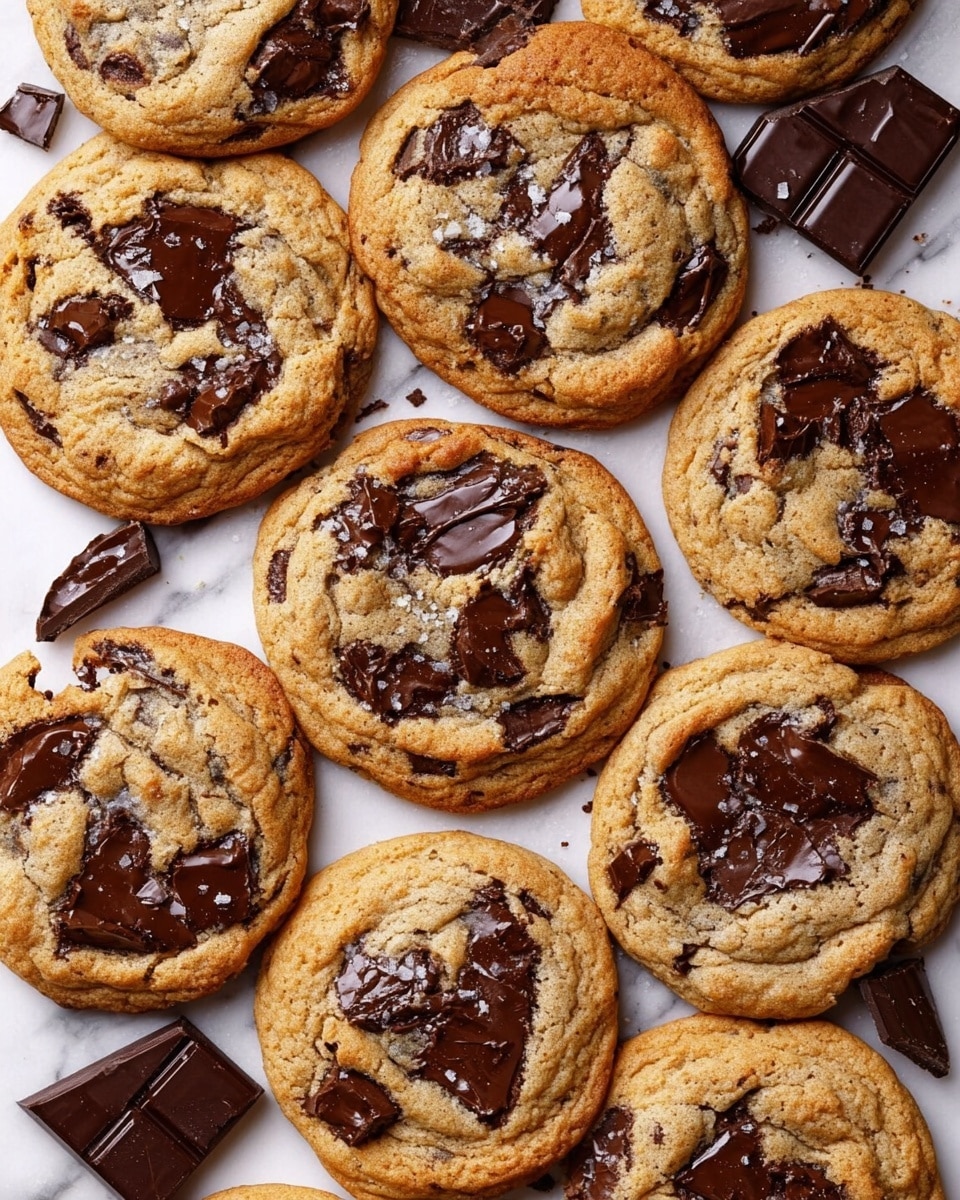
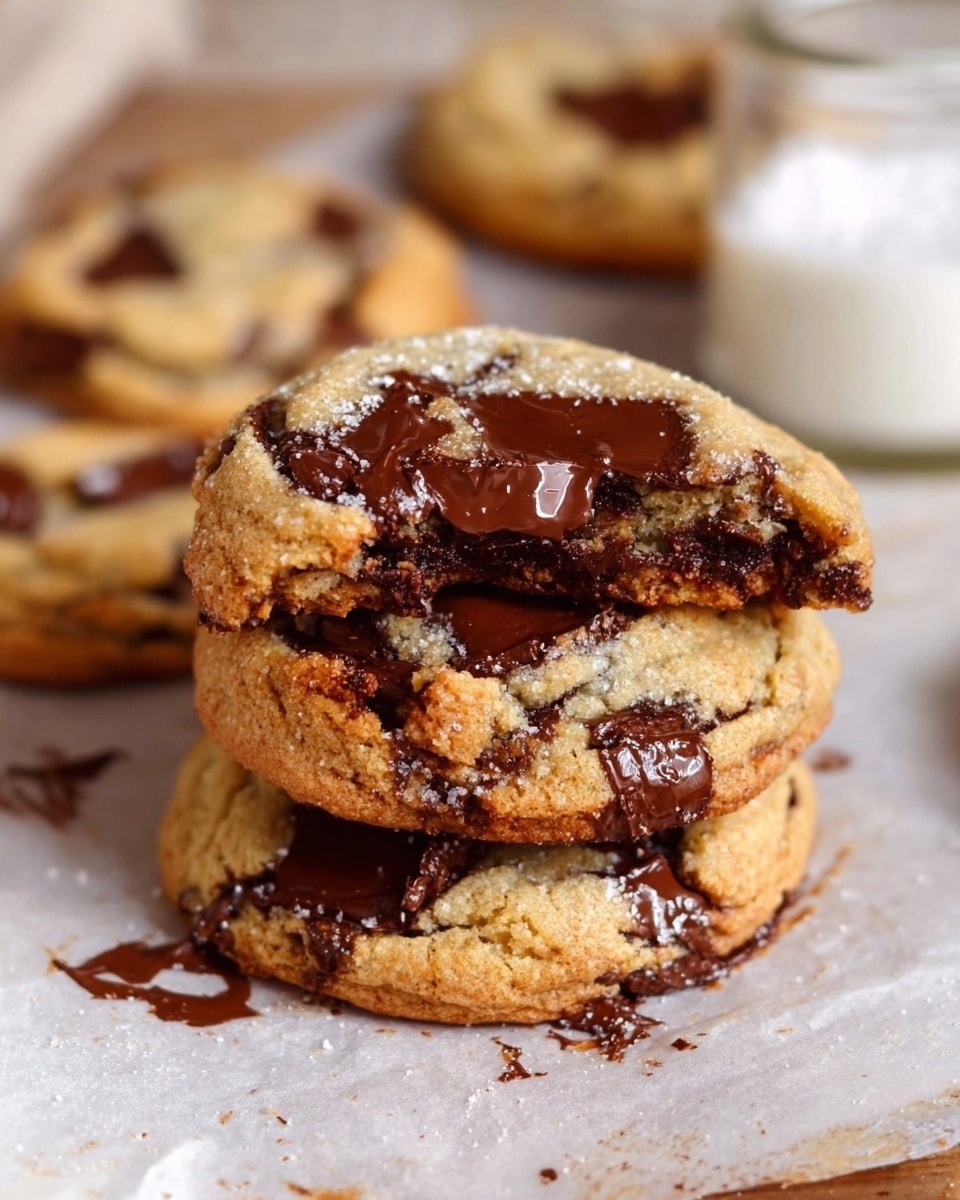
Oh, I can’t wait to share with you The BEST Chocolate Chip Cookies (Bakery Style) Recipe — these cookies are everything you want when you crave a classic treat but with that bakery wow-factor. They come out perfectly soft and chewy in the middle, with slightly crisp edges, and those glorious chunks of dark chocolate just melting in your mouth. I love this recipe because it’s straightforward but yields such incredible results; it’s like having a little slice of your favorite bakery at home anytime you want.
You’ll find that these cookies work wonderfully for just about any occasion — from a cozy night in, a kids’ party, or even when you want to impress friends without any fuss. What makes it worth trying is the overnight chill step that really brings out deeper flavor and that unbeatable texture, plus a sprinkle of flaky sea salt on top to elevate those rich chocolate flavors. Trust me, once you try these, you’ll be hooked!
Why You’ll Love This Recipe
- Perfect Texture: Soft, chewy centers with crisp edges just like your favorite bakery cookies.
- Simple Ingredients: Uses pantry staples with an easy technique anyone can master.
- Flavor Boost: The overnight chill develops deeper, richer flavors you won’t believe.
- Chocolate Perfection: Chunky dark chocolate pieces melt beautifully, plus optional flaky sea salt for a gourmet touch.

Ingredients You’ll Need
This recipe relies on quality ingredients that work in harmony to create those iconic bakery-style cookies. Using a kitchen scale is a game-changer here to get everything exact and consistent every time.
- All-purpose flour: The backbone of the cookie; be sure to measure by weight for accuracy.
- Baking soda: Gives just the right lift and texture—check the FAQ if you prefer thicker cookies.
- Salt: Balances sweetness and enhances all the flavors, especially important if using unsalted butter.
- Salted butter: Room temperature is key for smooth creaming with sugars.
- Dark brown sugar: Adds moisture and a rich, caramel-like flavor that keeps cookies moist.
- Granulated sugar: Contributes to the crisp edges and caramelization.
- Vanilla extract: Pure vanilla is a must for that warm, inviting aroma.
- Honey or corn syrup: Helps with the soft chew and subtle sweetness—don’t skip this!
- Large egg: At room temperature for better emulsification and mixing.
- Dark chocolate (55-70% cocoa): Coarsely chopped chunks provide melty pockets of intense chocolate love.
- Flaky sea salt (optional): Sprinkled on top after baking for a gourmet finish.
Variations
I love making this recipe my own sometimes by switching up chocolate types or adding little extras. You’re encouraged to get creative and tailor it to your family’s favorites or dietary needs — it’s surprisingly versatile!
- Chocolate swaps: I’ve had amazing results using milk chocolate chunks for a sweeter, softer bite or even mixing in white chocolate for contrast.
- Nutty twist: Adding chopped toasted pecans or walnuts gives a lovely crunchy note that my family always asks for.
- Gluten-free option: Using a 1:1 gluten-free flour blend works well, just be mindful of the texture changes and chill time.
- Vegan adaptation: You can substitute with vegan butter and a flax egg, though texture varies slightly—still delicious!
How to Make The BEST Chocolate Chip Cookies (Bakery Style) Recipe
Step 1: Prep Your Dry Ingredients
Start by whisking together the flour, baking soda, and salt in a medium bowl until it’s nicely combined — this helps distribute everything evenly so your cookies bake uniformly. I like to set this aside while I mix the wet ingredients.
Step 2: Cream Butter and Sugars
This part is key! Use room temperature butter and mix it vigorously with both brown and granulated sugars. You want the mixture smooth but not overly fluffy—think of a damp sandy paste rather than a whipped cream texture. I’ve found using a rubber spatula and a little elbow grease works wonders, or you can go for a stand mixer on medium-low speed for about 1-2 minutes.
Step 3: Add Vanilla, Honey, and Egg
Stir in the vanilla extract and honey before cracking in the egg. Mix these in fully until the dough looks creamy and well combined. Honey here isn’t just for sweetness—it helps keep the cookies chewy and moist, which is exactly what you want in bakery-style cookies.
Step 4: Combine Dry and Wet Mixtures, Fold in Chocolate
Add all the flour mixture at once to your butter and sugar bowl and fold gently but thoroughly. Stop when most of the flour is absorbed but before over-mixing. Then quickly fold in the chopped chocolate chunks so they’re evenly scattered throughout the dough. The dough should feel soft and a little moist—that’s your cue it’s just right!
Step 5: Chill the Dough
This is my favorite step because patience truly pays off here. Cover the dough with plastic wrap right on the surface and refrigerate for 8 to 24 hours. Believe me, the flavor improves and the texture gets that perfect bakery chew. If you’re in a hurry, you can chill for 4 hours, but 8 hours is my sweet spot.
Step 6: Scoop and Bake
When you’re ready, preheat your oven to 350°F and line cookie sheets with parchment. Using a 1½-ounce cookie scoop or a spoon, portion out dough balls (about 16 for a standard size). If your dough is too firm from chilling, let it sit at room temperature 20-30 minutes to soften so you can easily shape the balls. Don’t flatten them — you want nice puffy cookies!
Press a few extra chocolate chunks on top before baking. Bake 6 cookies per sheet for 9-11 minutes. You’re looking for puffed cookies with golden edges but soft centers. Pop them on a wire rack after a couple minutes to finish cooling.
Pro Tips for Making The BEST Chocolate Chip Cookies (Bakery Style) Recipe
- Use Room Temperature Ingredients: This helps everything blend smoothly and gives your dough the best texture.
- Don’t Overmix the Dough: Overworking flour develops gluten, making cookies tough—not what you want!
- Chill for Flavor Development: I learned this trick after many batches; it results in deeper, more complex flavor and a better texture.
- Watch the Bake Time Closely: Underbaked in the center is perfect; cookies will finish baking on the hot tray, so pull them once edges are golden.
How to Serve The BEST Chocolate Chip Cookies (Bakery Style) Recipe
Garnishes
I’m a big fan of sprinkling just a tiny pinch of flaky sea salt on top right after baking—it makes all the chocolate flavors pop and gives you that perfect sweet-salty balance. Sometimes I add a light drizzle of melted dark chocolate on top for fancy events, which always impresses guests.
Side Dishes
These cookies are delicious by themselves, but if you want to pair, a classic cold glass of milk is unbeatable. For an adult twist, I love serving alongside a scoop of vanilla bean ice cream or a rich coffee for dipping—always a crowd-pleaser.
Creative Ways to Present
For special occasions, I’ve arranged these cookies on a wooden board with a sprinkling of chocolate chunks and some whole vanilla pods for a rustic look. Wrapping a few in parchment with a twine bow makes for perfect homemade gifts. And if you’re feeling festive, adding a few colored sprinkle accents on top can’t hurt!
Make Ahead and Storage
Storing Leftovers
I like keeping these cookies fresh by storing them in an airtight container at room temperature. They stay soft and chewy for about 4-5 days. If you find they start to firm up, just pop them in the microwave for 10 seconds to revive that fresh-baked softness.
Freezing
Great news: this dough freezes beautifully! I portion the dough into balls and freeze them on a tray, then transfer to a freezer bag so I can bake fresh cookies anytime. When you want cookies, bake straight from frozen — just add a minute or two to the bake time.
Reheating
To reheat your cookies and keep them tasting freshly baked, I pop one on a microwave-safe plate and heat for about 10-15 seconds. If you want to refresh a larger batch, place them briefly in a 300°F oven for 5 minutes. Either way, you’ll get that melty chocolate goodness back!
FAQs
-
Can I use different types of chocolate for The BEST Chocolate Chip Cookies (Bakery Style) Recipe?
Absolutely! While I recommend dark chocolate for that rich flavor, you can swap in semisweet, milk, or even white chocolate chunks based on your taste preference. Just make sure to chop them into chunks rather than using mini chips for the best melty texture.
-
Why is chilling the dough important for these cookies?
Chilling the dough allows the ingredients to meld and the flour to fully hydrate, which improves the cookie’s texture and enhances flavor depth. It also helps prevent spreading during baking so your cookies stay thick and bakery-style.
-
How do I store leftover cookies to keep them fresh?
Store your cookies in an airtight container at room temperature. They stay soft for several days this way. To revive slightly stale cookies, warm them briefly in the microwave or oven before serving.
-
Can I make these cookies gluten-free or vegan?
Yes! For gluten-free, swap in a 1:1 gluten-free flour blend and chill a bit longer as texture changes. For vegan, use vegan butter and a flax egg; note the texture will be a little different but still delicious.
-
How do I prevent cookies from spreading too much?
Chilling the dough overnight is key to prevent spreading. Also, make sure not to over-mix and use the right ratio of butter and sugar. Using salted butter and following the baking temperature strictly will help maintain shape.
Final Thoughts
Honestly, The BEST Chocolate Chip Cookies (Bakery Style) Recipe has become my go-to whenever I want a guaranteed crowd-pleaser. It’s the kind of recipe that makes you feel like a pro baker — all without complicated steps or fancy equipment. I hope you enjoy making and sharing these cookies as much as I do; once you try them, you’ll see why my family and friends can’t get enough!
Print
The BEST Chocolate Chip Cookies (Bakery Style) Recipe
- Prep Time: 10 minutes
- Cook Time: 10 minutes
- Total Time: 12 hours 20 minutes
- Yield: 16 cookies
- Category: Dessert
- Method: Baking
- Cuisine: American
Description
This recipe delivers bakery-style chocolate chip cookies that feature a perfectly balanced texture: crispy edges with a soft, chewy center. Using a high-quality dark chocolate and a lengthy chilling time enhances the flavor depth and texture, making these cookies truly irresistible and ideal for sharing or indulging as a decadent treat.
Ingredients
Dry Ingredients
- 1 3/4 cups (250g) all-purpose flour
- 3/4 teaspoon baking soda
- 1/4 teaspoon salt (or 3/4 teaspoon salt if using unsalted butter)
Wet Ingredients
- 10 tablespoons (140g) salted butter, at room temperature
- 3/4 cup (165g) packed dark brown sugar
- 1/3 cup plus 1 tbsp (80g) granulated sugar
- 1 teaspoon (5ml) pure vanilla extract
- 1 teaspoon (5ml) honey or corn syrup
- 1 large egg, at room temperature
Chocolate
- 7 oz (200g) dark chocolate (55-70% cocoa), roughly chopped into chunks plus extra for topping
Optional
- Flaky sea salt for sprinkling
Instructions
- Mix Dry Ingredients: In a medium bowl, whisk together the all-purpose flour, baking soda, and salt until evenly blended. This ensures your baking soda and salt are well distributed for even rising and flavor.
- Cream Butter and Sugars: In a large bowl or stand mixer bowl, combine the softened salted butter with dark brown sugar, granulated sugar, and vanilla extract. Using a rubber spatula or mixer, vigorously mix the ingredients together by hand using the creaming method until you achieve a smooth, slightly fluffy texture resembling damp sand or a paste rather than an aerated batter. Then mix in the honey or corn syrup until fully incorporated.
- Add Egg: Add the large egg to the creamed butter mixture and mix thoroughly until fully incorporated, forming a cohesive dough base.
- Combine Flour Mixture With Wet Mixture: Add all the whisked flour mixture to the butter mixture at once and stir until most of the flour is absorbed, ensuring not to overmix.
- Fold in Chocolate Chunks: Before completely mixing in all flour, fold in the chopped dark chocolate chunks gently but thoroughly, distributing the chocolate evenly throughout the soft, moderately moist dough.
- Chill Dough: Cover the dough surface tightly with plastic wrap directly on top and refrigerate for 8-24 hours to enhance flavor and improve texture. If time is limited, chilling for a minimum of 4 hours will suffice.
- Prepare for Baking: When ready to bake, preheat your oven to 350°F (175°C). Line two large baking sheets with parchment paper for a non-stick surface.
- Scoop Dough Balls: Use a 1 ½-ounce cookie scoop or divide into 16 balls. If dough is too firm, let it warm at room temperature for 20-30 minutes to soften. Place dough balls on prepared baking sheets spaced 2 inches apart without flattening. For slightly smaller cookies, divide into 18 balls.
- Add Extra Chocolate Topping: Gently press a few extra chocolate chunks atop each dough ball to add an inviting chocolatey finish.
- Bake Cookies: Bake 6 cookies per sheet for 9-11 minutes until cookies are puffed, golden at the edges, and still soft in the center. Smaller cookies require 8-10 minutes. Avoid overbaking, as cookies will continue cooking on the hot sheet after removal.
- Cool and Serve: Let the cookies cool on the baking sheets for 2 minutes, then transfer carefully to a wire rack to cool completely. Optionally, sprinkle flaky sea salt over warm cookies for a delightful finish.
Notes
- Use a kitchen scale for best accuracy with ingredient measurements.
- Chilling the dough for at least 8 hours improves flavor and cookie texture significantly.
- You can substitute honey or corn syrup, but read expert tips about their effect on texture and moisture.
- If you prefer semisweet chocolate chips, use high-quality ones for optimal taste.
- Do not overbake cookies to keep their soft centers; they will continue cooking slightly on the hot baking sheet.
Nutrition
- Serving Size: 1 cookie
- Calories: 180 kcal
- Sugar: 14 g
- Sodium: 110 mg
- Fat: 9 g
- Saturated Fat: 5 g
- Unsaturated Fat: 3 g
- Trans Fat: 0 g
- Carbohydrates: 23 g
- Fiber: 2 g
- Protein: 2 g
- Cholesterol: 30 mg

