
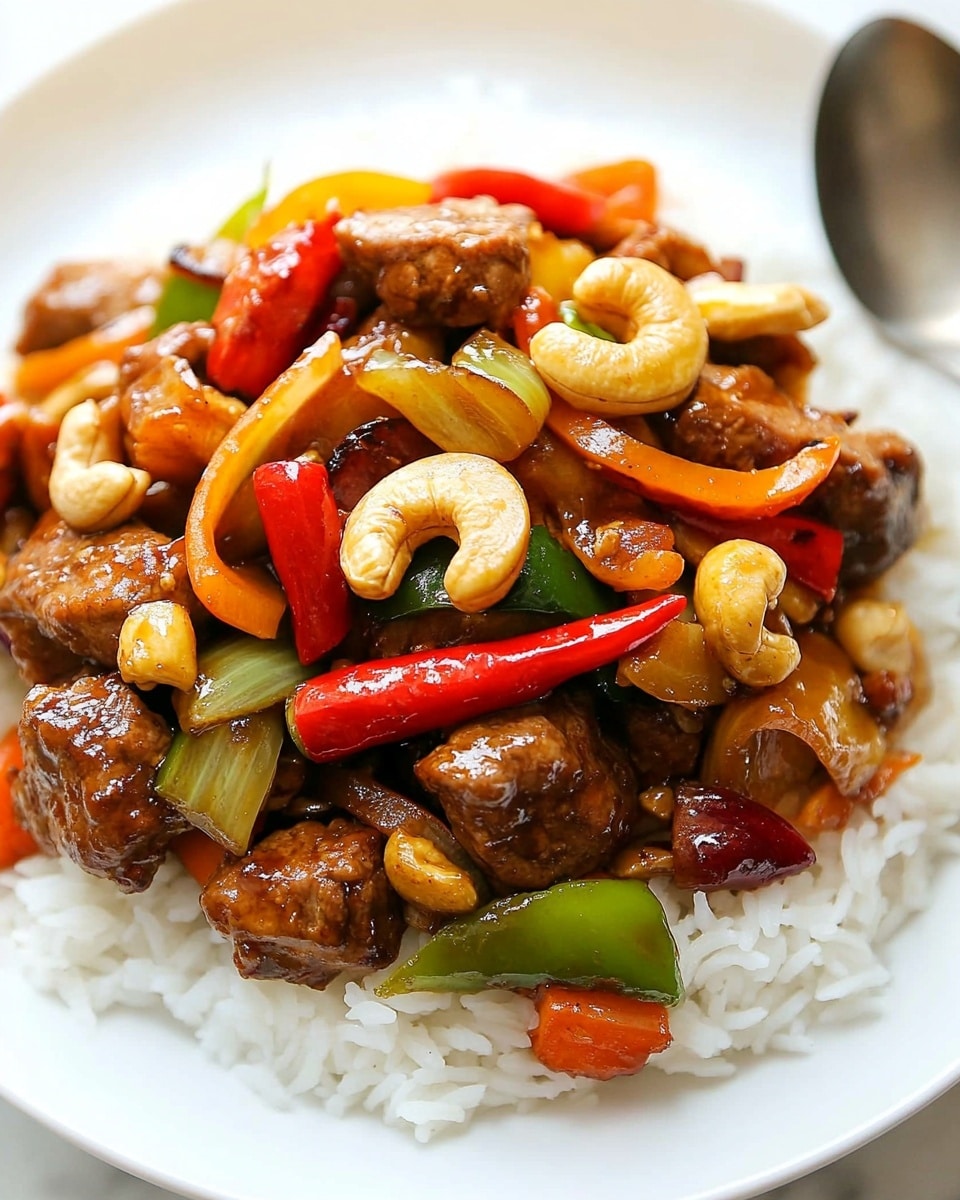
I absolutely love this Thai Cashew Chicken Recipe because it strikes the perfect balance between crunchy, savory, and slightly sweet, all in one bite. It’s one of those dishes that feels special enough for guests but simple enough for a weeknight dinner when you want something quick and satisfying. You’ll find that the tender chicken thighs, coated with a delicate crust, soak up all those tasty flavors from the soy and oyster sauce beautifully.
When I first tried making this at home, I was amazed at how easily the ingredients came together to create such a fresh, vibrant dish. The combination of the toasted cashews and colorful veggies adds the perfect texture contrast and brightness. Whether you’re feeding family or impressing friends, this Thai Cashew Chicken Recipe is a crowd-pleaser that’s worth adding to your regular rotation.
Why You’ll Love This Recipe
- Quick and Easy: You can whip it up in about 35 minutes—perfect for busy days without sacrificing flavor.
- Perfect Texture: Flour coating makes the chicken delightfully crispy while locking in juicy tenderness.
- Balanced Flavors: The sweet, salty, and mildly spicy notes come together to make every bite irresistible.
- Family Favorite: My family goes crazy for this dish, and I’m sure yours will too once you try it.

Ingredients You’ll Need
These ingredients work beautifully together to create layers of flavor and texture. You’ll want to grab fresh veggies and quality chicken thighs for the best results. Also, don’t skip on the cashews—they add that amazing nutty crunch that makes this recipe stand out.
- Chicken Thighs: I recommend boneless, skinless thighs because they stay juicy and develop great crust when fried.
- White Pepper: Adds a subtle heat without overpowering the dish.
- Light Soy Sauce: Gives a savory, salty base flavor; light soy sauce keeps it delicate.
- Plain Flour: Coats the chicken to create a crispy layer that holds onto the sauce.
- Vegetable Oil: Needed for frying; canola or peanut oil also works well if you want a neutral taste.
- Unsalted Cashew Nuts: Toasted just right, these are the hero crunch of the dish.
- White Onions: Halved and layered, they provide sweetness and texture.
- Bell Peppers: I use a mix of red and green for color and fresh flavor.
- Garlic: Finely diced to infuse the oil and sauce with aroma.
- Red Chillies: Deseeded if you prefer milder heat; otherwise, leave the seeds for a kick.
- Spring Onions: Separate the white and green parts for cooking and garnish.
- Granulated Sugar: Sweetens the sauce just right to balance the savory notes.
- Oyster Sauce: Adds umami depth and richness you won’t want to skip.
- Cooked Rice: Essential to serve alongside and soak up all the delicious sauce.
Variations
I love tweaking this Thai Cashew Chicken Recipe to fit different moods and dietary needs. Feel free to customize the spice level or swap vegetables to suit what’s fresh or in your fridge. Trust me, each variation still shines through with that signature cashew crunch and tasty sauce.
- Use Chicken Breast: If you want leaner meat, breast works fine—just remember it cooks faster so watch carefully to avoid drying it out.
- Add More Veggies: Sometimes I toss in snap peas or baby corn for extra crunch and color.
- Spicy Version: Leave the chilli seeds in or add a pinch of chilli flakes if you like it fiery.
- Gluten-Free: Swap plain flour for cornstarch and check that your sauces are gluten-free to make this friendly for gluten-sensitive diets.
How to Make Thai Cashew Chicken Recipe
Step 1: Prep and Coat the Chicken
Start by combining your diced chicken thighs with white pepper and 2 teaspoons of light soy sauce in a large bowl. This simple marinade adds just enough flavor before frying. Then, mix in the plain flour until the chicken is nicely coated with a thin layer—that crust will make all the difference later on. I like to make sure every piece is coated evenly by tossing with my hands or a spoon gently.
Step 2: Toast the Cashews
Heat your vegetable oil in a wok or deep frying pan over medium-high heat—it should be hot enough that a small piece of chicken sizzles immediately. Toss in the cashews and fry them until they turn a deep golden color, watching closely so they don’t burn (cashews can go from perfect to bitter in seconds). Use a slotted spoon to remove them and set aside; the oil will be packed with that nutty flavor now!
Step 3: Fry the Chicken Batches
Working in two batches, shake off any excess flour from the chicken before adding to the hot oil. Fry each batch until the outside is golden and crisp, and the chicken is cooked through—about 5 minutes per batch depending on the size of your pieces. Make sure the chicken is piping hot inside and remove with a slotted spoon onto a plate lined with paper towels to drain. When finished, keep just about 2 tablespoons of the oil in the pan to cook the veggies.
Step 4: Sauté Veggies and Combine
Add your diced peppers, onions, and garlic to the oil, stirring and frying for a couple of minutes until they soften slightly. Then toss in the chopped red chillies and the white parts of the spring onions—fry another minute to release their flavors. Return the chicken to the pan along with the granulated sugar, oyster sauce, and the remaining tablespoon of soy sauce. Give everything a good toss to coat the chicken and veggies evenly. Finally, stir in the toasted cashews and the green parts of the spring onions. You’ll notice the sugar melts, and the sauce becomes glossy, lightly coating everything in a delicious glaze.
Serve this Thai Cashew Chicken hot, ideally over a bed of fluffy steamed rice to soak up every bit of the sauce. You’ll enjoy how easy and flavorful this dish is!
Pro Tips for Making Thai Cashew Chicken Recipe
- Crisp Chicken Crust: Make sure you coat the chicken well in flour but avoid clumps for an even crispy coating.
- Watch Your Oil Temperature: Medium-high heat works best. Too hot and the chicken will burn outside but remain raw inside.
- Toast Cashews Separately: Frying cashews first flavors the oil and keeps them crunchy without getting soggy in the sauce.
- Balance the Sauce: Adjust sugar and soy sauce at the end to suit your taste—some days I like it sweeter, other days saltier.
How to Serve Thai Cashew Chicken Recipe
Garnishes
I usually finish this dish with the vibrant green parts of spring onions for a fresh pop of color and a mild onion flavor. Sometimes, I sprinkle a few extra toasted cashews on top for visual appeal and extra crunch. A wedge of lime on the side is also fantastic if you want a zesty contrast, especially on warmer days.
Side Dishes
This dish pairs beautifully with steamed jasmine rice to soak up the sauce, but I’ve also served it alongside brown rice or even simple noodles. A crisp cucumber salad or light Asian slaw brings a refreshing crunch and balances the rich flavors perfectly if you want to round out the meal.
Creative Ways to Present
For special dinners, I like serving the Thai Cashew Chicken Recipe in a hollowed-out pineapple to wow guests and infuse subtle sweetness. Alternatively, spooning it into lettuce cups creates a fun, hands-on appetizer vibe that everyone appreciates. It’s a versatile dish that’s fun to dress up or keep casual!
Make Ahead and Storage
Storing Leftovers
I store leftovers in an airtight container in the fridge for up to 3 days. The chicken and veggies hold up really well, and the flavors even deepen overnight. Just be sure the dish cools to room temperature before sealing to maintain freshness.
Freezing
This Thai Cashew Chicken Recipe freezes fairly well if you want to batch-cook. Freeze in portioned airtight containers and thaw overnight in the fridge before reheating. I avoided freezing cashews separately since they lose their crunch after thawing, so I usually toast fresh ones while reheating.
Reheating
To reheat, I gently warm leftovers in a skillet over medium heat with a splash of water or soy sauce to refresh the sauce. This method keeps the chicken juicy and prevents it from drying out, plus it re-crisps the veggies a little. A quick microwave zap works if you’re in a rush, but stovetop is my favorite.
FAQs
-
Can I use chicken breast instead of thighs for this Thai Cashew Chicken Recipe?
Absolutely! Chicken breast is leaner and cooks faster, so just watch it closely to avoid overcooking and drying it out. Thighs are preferred for their juiciness and ability to hold a crispy crust, but breast works well if that’s what you have on hand.
-
How spicy is this Thai Cashew Chicken Recipe?
The heat level is mild to medium depending on how much chili you use and whether you remove the seeds. You can easily control the spice by deseeding the chillies or adding more if you like it hotter.
-
Can I make this recipe gluten-free?
Yes! Simply replace the plain flour with cornstarch or a gluten-free flour blend and ensure your soy and oyster sauces are gluten-free versions to keep it safe and delicious.
-
What’s the best way to keep the cashews crunchy?
Fry or toast the cashews separately just before adding them back into the dish, as reheating or freezing can soften their crunch. Adding fresh cashews near the end of cooking maintains their texture perfectly.
Final Thoughts
This Thai Cashew Chicken Recipe quickly became one of my go-to comfort meals because of its incredible flavor and easy preparation. I love sharing it with friends who then can’t believe how simple it is to make such a fantastic restaurant-style dish at home. If you’re looking for a tasty, crowd-pleasing recipe that delivers on texture and flavor, you’ll really enjoy giving this one a try—you might just find it becoming a family favorite like mine!
Print
Thai Cashew Chicken Recipe
- Prep Time: 15 minutes
- Cook Time: 20 minutes
- Total Time: 35 minutes
- Yield: 4 servings
- Category: Main Course
- Method: Frying
- Cuisine: Thai
Description
A flavorful and crispy Thai Cashew Chicken dish featuring golden fried chicken thigh pieces tossed with crunchy cashews, peppers, onions, and a glossy savory sauce. Perfect for a quick weeknight dinner served over steamed rice.
Ingredients
Chicken and Coating
- 600g / 1.3lbs boneless skinless Chicken Thighs, diced into bite-sized pieces
- 1 tsp White Pepper
- 1 tbsp + 2 tsp Light Soy Sauce
- 50g / 1/3 cup Plain Flour
For Frying
- 120ml / 1/2 cup Vegetable Oil
- 200g / 7oz Unsalted Cashew Nuts
Vegetables and Aromatics
- 2 medium White Onions, halved then diced into quarters (pull layers apart)
- 2 medium Peppers (1 red, 1 green), diced
- 4 cloves Garlic, finely diced
- 2 Red Chillies, deseeded if preferred less spice
- 3 Spring Onions, separated into firm white and green parts, cut into 2.5cm/1″ pieces
Sauce and Seasoning
- 1 1/2 tbsp Granulated Sugar
- 1 tbsp Oyster Sauce
- Cooked Rice, for serving
Instructions
- Prepare Chicken: In a large mixing bowl, combine diced chicken with white pepper and 2 teaspoons of light soy sauce. Mix in the plain flour thoroughly until the chicken pieces are fully coated for a crisp crust.
- Fry Cashews: Heat vegetable oil in a wok or large deep frying pan over medium-high heat. Once hot, add cashews and fry until deep golden in color, watching carefully to prevent burning. Remove cashews with a slotted spoon and set aside, leaving oil in the pan.
- Fry Chicken: In two batches, shake off excess flour from the chicken and fry in the hot oil until golden and crisp on the outside and cooked through (about 5 minutes per batch). Remove each batch with a slotted spoon and set aside. Discard all oil except roughly 2 tablespoons remaining in the pan.
- Sauté Vegetables: Add diced peppers, onions, and garlic to the retained oil in the wok. Fry for a couple of minutes until softened, then add the red chillies and firm white parts of the spring onions. Fry for an additional minute.
- Combine and Finish: Return the fried chicken to the wok and stir well. Add granulated sugar, oyster sauce, and remaining 1 tablespoon of light soy sauce. Toss in the fried cashews and green parts of the spring onions. Stir until the sugar has dissolved and the sauce has a glossy sheen coating the ingredients evenly.
- Serve: Serve hot with steamed cooked rice and enjoy this classic Thai meal with a balanced combination of crunchy, savory, and mildly sweet flavors.
Notes
- Chicken: Thigh meat is recommended to retain moisture and develop a golden crust. Breast can be used but cooks faster and can dry out.
- Flour Coating: Essential for creating the crisp crust that adheres to the sauce.
- Chillies: Traditionally dried red chillies are used, but fresh large red chillies from supermarkets work well and are easier to find.
- Cookbook: This recipe is featured in the cookbook ‘Comfy’.
- Calories: Nutritional info is estimated assuming half the frying oil is absorbed and consumed.
Nutrition
- Serving Size: 1 serving (approximately 1/4 recipe)
- Calories: 540 kcal
- Sugar: 8 g
- Sodium: 750 mg
- Fat: 34 g
- Saturated Fat: 6 g
- Unsaturated Fat: 26 g
- Trans Fat: 0 g
- Carbohydrates: 25 g
- Fiber: 3 g
- Protein: 37 g
- Cholesterol: 110 mg


