I absolutely love sharing this Fresh Huevos Rancheros Recipe because it’s a perfect marriage of fresh, vibrant flavors and comforting heartiness. Whenever I make it, the kitchen fills with that irresistible aroma of spiced beans and warm tortillas, and it feels like sharing a little bit of Mexico’s soul right at my own table. You’ll find that this recipe works wonderfully for a weekend brunch with friends or a simple, flavorful dinner that satisfies without any fuss.
What makes this Fresh Huevos Rancheros Recipe stand out for me is how fresh and bright it tastes, thanks to that zesty pico de gallo and the lime-laced beans. I’ve learned that small touches like freshly chopped cilantro and a squeeze of lime juice can turn a breakfast classic into something you’ll want to make again and again. Plus, it’s incredibly flexible, so whether you’re making it for four or just two, it’s easy to adjust and tweak based on what you have on hand.
Why You’ll Love This Recipe
- Fresh and Flavorful: The pico de gallo and lime-infused beans brighten every bite, making it light yet satisfying.
- Quick and Easy: You’ll have this delicious meal on the table in under an hour with simple, pantry-friendly ingredients.
- Versatile and Customizable: Whether you want it dairy-free, gluten-free, or extra spicy, you can easily adapt this recipe.
- Crowd-Pleaser: My family goes crazy for it every time I make it, and I bet yours will too.

Ingredients You’ll Need
This Fresh Huevos Rancheros Recipe comes together with everyday ingredients that complement each other beautifully—the creamy beans, fresh pico de gallo, and warm tortillas create harmony in every bite. When shopping, choose ripe tomatoes and fresh cilantro to really make the flavors pop.
- Tomatoes: Ripe, medium tomatoes give the pico de gallo its juicy base—avoid underripe ones to keep the salsa fresh and sweet.
- White Onion: Adds a mild sharpness and crunch, both in the pico de gallo and the beans.
- Fresh Cilantro: Essential for that herbaceous kick—use fresh for best flavor.
- Lime Juice: The secret ingredient to brighten the beans and the pico de gallo with a touch of acidity.
- Sea Salt: Balances the flavors perfectly without overpowering.
- Extra-Virgin Olive Oil: For sautéing onions and crisping tortillas, adds richness and depth.
- Ground Cumin: Gives the beans a warm, earthy flavor—ensure it’s fresh for maximum aroma.
- Black or Pinto Beans: Use canned for convenience or cooked from scratch if you’re up for it—the creamier, the better.
- Red Salsa: Your favorite version works here, homemade or store-bought, adding that familiar tangy touch.
- Eggs: The star protein—fresh, large eggs cook up beautifully sunny side up.
- Corn Tortillas: The sturdy base; I always opt for fresh or high-quality brands to avoid breakage.
- Monterey Jack Cheese (Optional): Melts nicely over the beans—it adds a subtle creaminess you’ll love.
- Optional Garnishes: Cotija or feta cheese, sliced avocado, extra cilantro, and hot sauce make this dish irresistible.
Variations
I love how flexible this Fresh Huevos Rancheros Recipe is—it’s one of those dishes where playing around with toppings and sides can keep it exciting every time you make it. Don’t be afraid to make it your own!
- Salsa Verde Twist: I swapped out the red salsa once for a tangy salsa verde, and it completely refreshed the flavor profile—highly recommend trying it!
- Dairy-Free Option: Skipping the cheese still leaves you with a rich and satisfying dish, especially if you add avocado slices for creaminess.
- Spicy Boost: Adding chopped jalapeños or a splash of your favorite hot sauce brings a lively kick that wakes up all the flavors.
- Vegetarian Protein Swap: Tried adding sautéed mushrooms in place of beans one time for a meaty texture—delicious and hearty.
How to Make Fresh Huevos Rancheros Recipe
Step 1: Whip Up the Fresh Pico de Gallo
Start by mixing your chopped tomatoes, onion, cilantro, lime juice, and salt in a bowl. I like to let this sit while I prepare everything else—it gives the flavors time to marry and intensify. Just give it a good stir before serving so you get that fresh, tangy taste in every bite.
Step 2: Cook and Mash the Beans
Heat olive oil in a saucepan, then sauté the chopped onion with a pinch of salt until translucent—this softens the onion and deepens the flavor. Stir in cumin until fragrant, then add your drained beans and a little water. Cover and simmer for 5 minutes to warm through. Remove the lid and mash about half the beans with a fork or potato masher—that texture contrast is key! Cook uncovered until thickened, then finish with black pepper and lime juice to brighten it up. I always taste and tweak the seasoning here to make sure it’s just right.
Step 3: Warm the Salsa
Gently warm your favorite red salsa in a saucepan over medium low heat. This step helps meld the salsa’s flavors without drying it out. If you’re in a rush, the microwave works fine, but it won’t have the same melded richness. Either way, keeping the salsa warm is essential for a cozy huevos rancheros experience.
Step 4: Heat Tortillas and Layer the Base
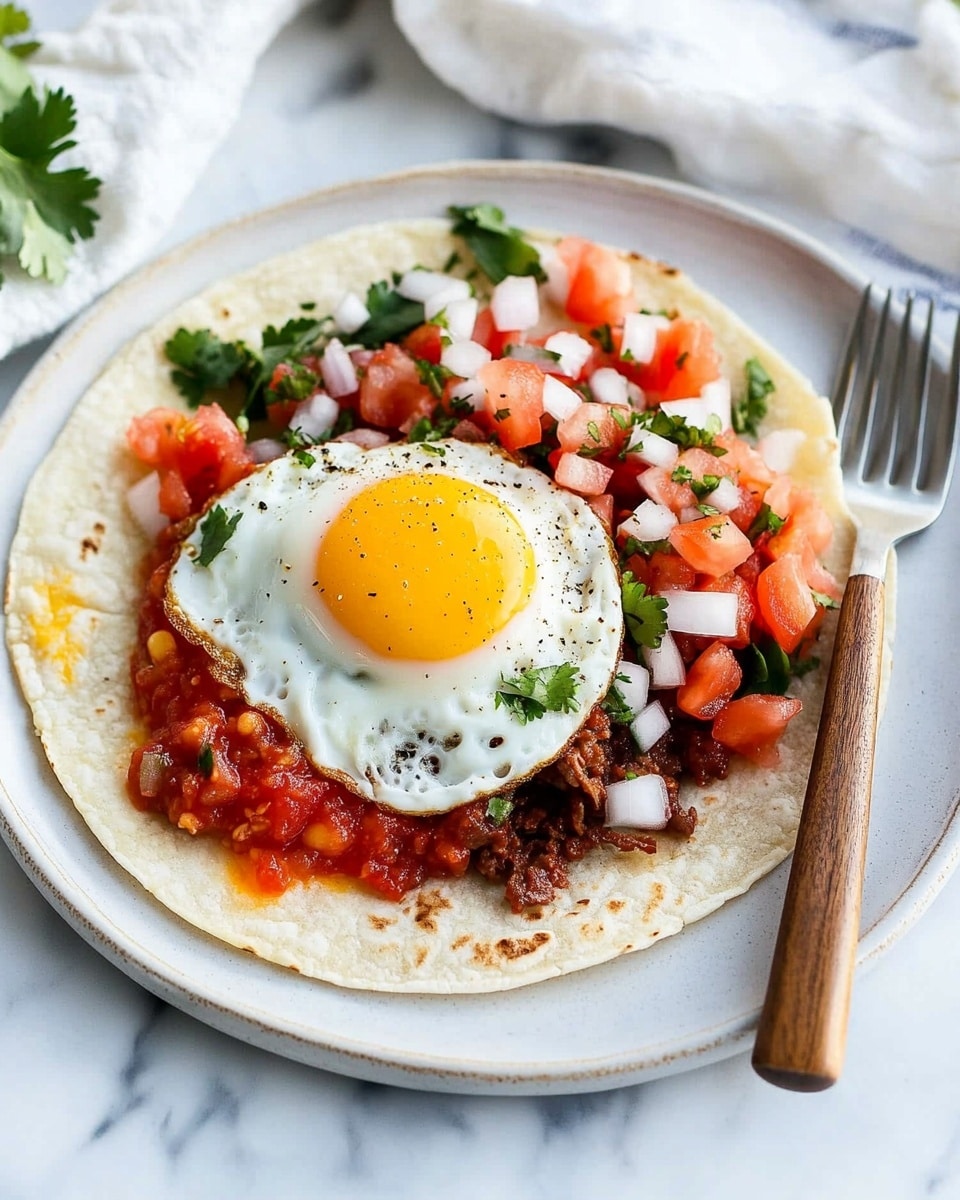
In a small skillet, warm each corn tortilla one by one until soft and slightly crisp, flipping as needed. I find this takes just a minute or two per side. Then, spread a generous layer of your black bean mixture over each tortilla and top with shredded Monterey Jack cheese if you’re using it. Set these ready plates aside while you fry the eggs.
Step 5: Fry the Eggs to Perfection
Heat a teaspoon of olive oil in the skillet until shimmering, then carefully crack each egg in without breaking the yolk. I gently tilt the pan occasionally to baste the whites in hot oil—that helps them set evenly without browning too much. Cook until the whites are firm but the yolk is still runny (or more set if you prefer). Transfer each egg onto a prepared tortilla. This step is where a little patience pays off—I promise it’s worth it!
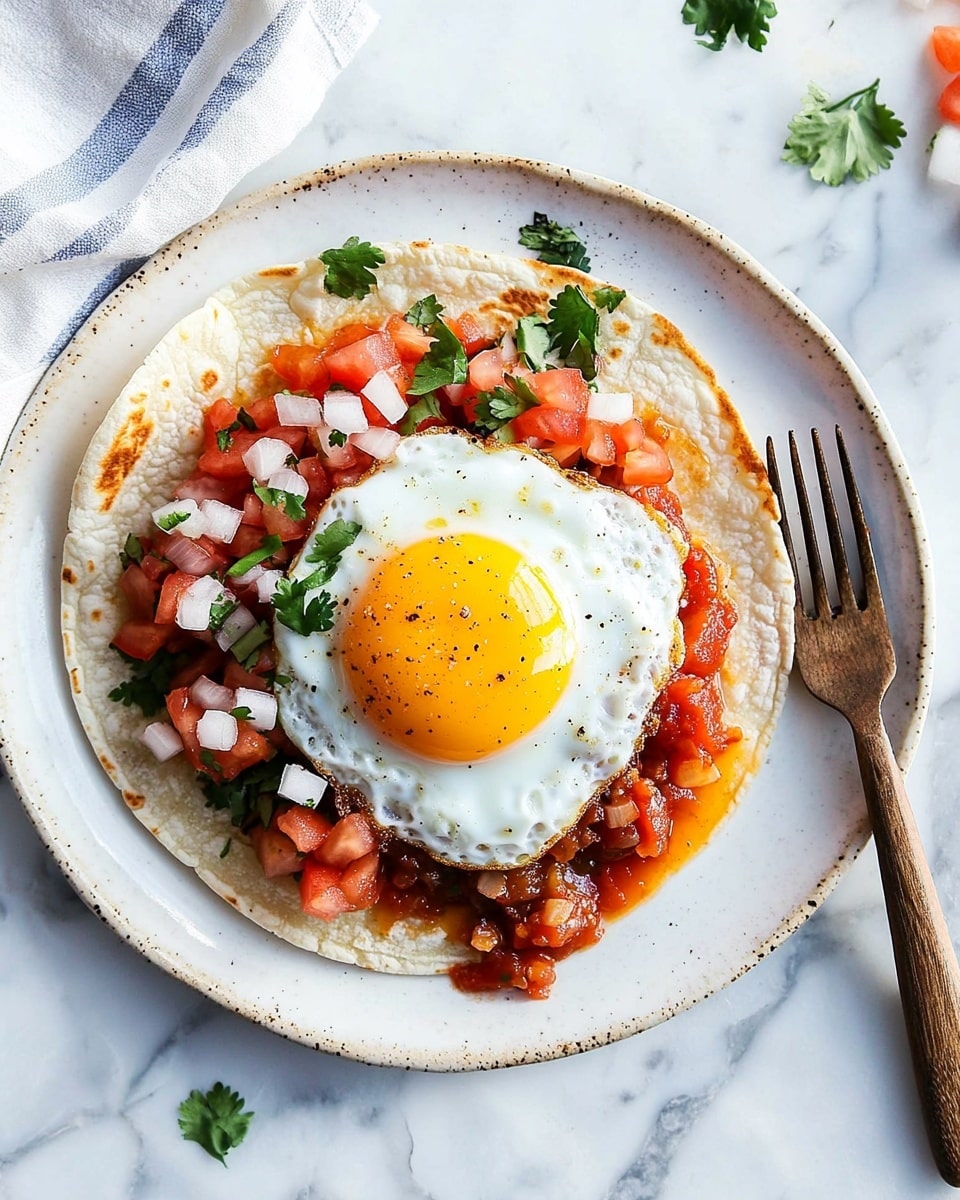
Step 6: Assemble and Garnish
Spoon warm salsa across the dish but avoid the yolk so you keep that beautiful golden pool intact. Then, add the pico de gallo using a slotted spoon to leave behind any excess liquid—nobody wants a soggy base! Finish with freshly ground black pepper and your favorite garnishes, like crumbled Cotija cheese or creamy avocado slices. Serve immediately for the best, freshest taste.
Pro Tips for Making Fresh Huevos Rancheros Recipe
- Let the Pico Rest: I discovered letting the pico de gallo sit for at least 15 minutes really sharpens the flavors without losing its vibrant crunch.
- Mix Textures with Beans: Mashing just half the beans creates a perfect creamy-yet-chunky texture that’s so satisfying.
- Gentle Egg Frying: Basting the eggs with hot oil makes the whites perfectly set while keeping yolks luscious and runny.
- Avoid Soggy Tortillas: Warm and slightly crisp your tortillas just before serving to prevent them from getting soggy under the bean layer.
How to Serve Fresh Huevos Rancheros Recipe
Garnishes
I love topping my huevos rancheros with crumbled Cotija cheese for that salty tang, plus sliced avocado for creaminess. A sprinkle of fresh cilantro adds color and herbal brightness, and sometimes I drizzle a little hot sauce for an extra kick. These simple little touches elevate the dish to something special without much extra effort.
Side Dishes
To round out the meal, I often serve this with some crispy tortilla chips and a side of refried beans leftover from the recipe. A fresh green salad or lightly dressed cabbage slaw also balances the richness nicely. For a brunch crowd, a side of fresh fruit or even some roasted potatoes makes a great complement.
Creative Ways to Present
For special occasions, I like to plate each serving on a colorful ceramic dish and add edible flowers or microgreens for an elevated look. Layering the tortillas in a stacked presentation with each component visible gives a nice rustic vibe. You could even serve the components build-your-own style, letting everyone customize their own huevos rancheros—it’s always a hit!
Make Ahead and Storage
Storing Leftovers
I recommend storing the pico de gallo, beans, and salsa separately in airtight containers to keep everything fresh. Tortillas can be wrapped tightly and stored in the fridge as well. Eggs, I find, are best cooked fresh instead of reheated, but if you have leftovers, keep them in a separate container and reheat gently.
Freezing
I don’t usually freeze this entire dish because the texture of fresh pico de gallo and fried eggs changes, but the beans freeze beautifully on their own. Just portion the beans into freezer-safe containers, and thaw overnight in the fridge before reheating.
Reheating
To reheat the beans and salsa, warm them gently in a saucepan over low heat to avoid drying out. Fresh tortillas can be reheated wrapped in a damp paper towel in the microwave or briefly on a skillet. For the eggs, I prefer to fry fresh ones—they taste way better than reheated leftovers!
FAQs
-
Can I make this Fresh Huevos Rancheros Recipe vegan?
Absolutely! To make it vegan, simply skip the eggs and cheese. You can add sautéed veggies or tofu scramble instead of eggs to keep it hearty and satisfying.
-
What kind of salsa works best in this recipe?
Both homemade and good-quality jarred red salsa work great here. If you prefer a milder or tangier flavor, you can swap in salsa verde as a delicious variation.
-
How do I keep the tortillas from getting soggy?
Warming the tortillas briefly on a skillet before assembling helps keep them firm. Also, avoid adding too much liquid from the pico de gallo or salsa directly onto them to maintain texture.
-
Can I use canned beans, or should I cook my own?
Canned beans are perfect for convenience and taste great in this recipe. Just be sure to rinse and drain them well before cooking to remove excess sodium and any canning liquid flavor.
Final Thoughts
This Fresh Huevos Rancheros Recipe has become one of my go-to dishes whenever I want something that feels homemade but not complicated. It’s balanced, colorful, and packed with layers of texture and taste that always impress at the table. I hope you give it a try and find, like I did, that with just a few fresh ingredients and some simple steps, you can create a breakfast or dinner that’s both satisfying and unforgettable. Trust me, once you savor that first bite, you’ll be making it over and over!
Print
Fresh Huevos Rancheros Recipe
- Prep Time: 25 minutes
- Cook Time: 20 minutes
- Total Time: 45 minutes
- Yield: 4 servings
- Category: Breakfast
- Method: Frying
- Cuisine: Mexican
- Diet: Gluten Free
Description
Fresh Huevos Rancheros is a vibrant and satisfying Mexican breakfast dish featuring crispy warm corn tortillas topped with a flavorful black bean mixture, perfectly fried eggs, fresh pico de gallo, and warm red salsa. This recipe combines fresh ingredients and simple cooking techniques to deliver a hearty, delicious meal that’s perfect for any time of the day.
Ingredients
Pico de Gallo
- 2 medium ripe tomatoes, chopped (about 1 1/2 cups)
- 1/4 cup finely chopped white onion
- 1/4 cup chopped fresh cilantro
- 2 tablespoons lime juice (about 1 medium lime)
- 1/4 teaspoon fine-grain sea salt
Refried Beans
- 2 teaspoons extra-virgin olive oil
- 1/4 cup finely chopped white onion
- 1/4 teaspoon fine-grain sea salt
- 1 teaspoon ground cumin
- 1 can (15 ounces) black beans or pinto beans, rinsed and drained, or 1 1/2 cups cooked beans
- 1/4 cup water
- Freshly ground black pepper, to taste
- 1/2 teaspoon lime juice
Everything Else
- 1 1/2 cups (12 ounces) of your favorite red salsa, either homemade or jarred
- 4 teaspoons extra-virgin olive oil, divided
- 4 eggs
- 4 corn tortillas
- 1/2 cup shredded Monterey Jack cheese (optional)
- Freshly ground black pepper
- Optional garnishes: Crumbled Cotija or feta cheese, sliced avocado, additional chopped cilantro and/or hot sauce
Instructions
- Prepare the Pico de Gallo: In a medium bowl, combine the chopped tomatoes, finely chopped white onion, chopped cilantro, lime juice, and fine-grain sea salt. Stir gently to combine all flavors and set aside to allow the ingredients to meld.
- Cook the Beans: Heat 2 teaspoons of extra-virgin olive oil in a small saucepan over medium heat until shimmering. Add the finely chopped onion and sea salt; cook, stirring occasionally, until the onions soften and become translucent, about 3 to 6 minutes. Stir in ground cumin and cook for about 30 seconds until aromatic. Add the rinsed black or pinto beans and ¼ cup water. Stir well, cover, and cook for 5 minutes. Reduce heat to low, remove the lid, and mash at least half the beans with a potato masher or fork. Continue cooking uncovered, stirring frequently, for 2 to 3 minutes until the mixture thickens. Remove from heat, season with freshly ground black pepper and lime juice, and adjust salt or lime juice if needed. If too dry, add a small splash of water. Cover and keep warm.
- Warm the Salsa: Pour the red salsa into a medium saucepan and heat over medium heat until it simmers, stirring occasionally. Reduce heat to low and keep warm. Alternatively, warm the salsa gently in the microwave.
- Warm the Tortillas: Heat a small skillet over medium heat. Warm each corn tortilla individually by flipping as needed until soft and pliable. Spread the warm black bean mixture evenly over each tortilla placed on individual plates. If using, sprinkle shredded Monterey Jack cheese on top at this stage. Set aside.
- Fry the Eggs: In the same skillet, heat 1 teaspoon of olive oil over medium heat until shimmering. Crack an egg carefully into the skillet without breaking the yolk. Fry until the whites are set and the yolk reaches your preferred doneness, occasionally tilting the pan to distribute oil. Remove and place the fried egg on top of each prepared tortilla with beans and cheese. Repeat with remaining eggs.
- Assemble and Serve: Spoon about one-fourth of the warm salsa across each plate, carefully avoiding the egg yolk. Using a slotted spoon or fork, add pico de gallo atop each dish, leaving excess tomato juice behind. Sprinkle freshly ground black pepper over the top and add any optional garnishes such as crumbled Cotija or feta cheese, sliced avocado, chopped cilantro, or hot sauce. Serve immediately for the best experience.
- Storage Tip: If not serving all at once, store the components separately and fry tortillas and eggs fresh before serving to ensure optimal texture and flavor.
Notes
- If tomatoes aren’t in season, skip the pico de gallo and top your dish with chopped cilantro and avocado slices instead.
- For leftovers, store individual components separately and fry tortillas and eggs just before serving to preserve freshness.
- Change it up by using salsa verde and sliced avocado instead of red salsa and pico de gallo.
- Make it gluten-free by using certified gluten-free corn tortillas.
- Make it dairy-free by omitting the cheese.


