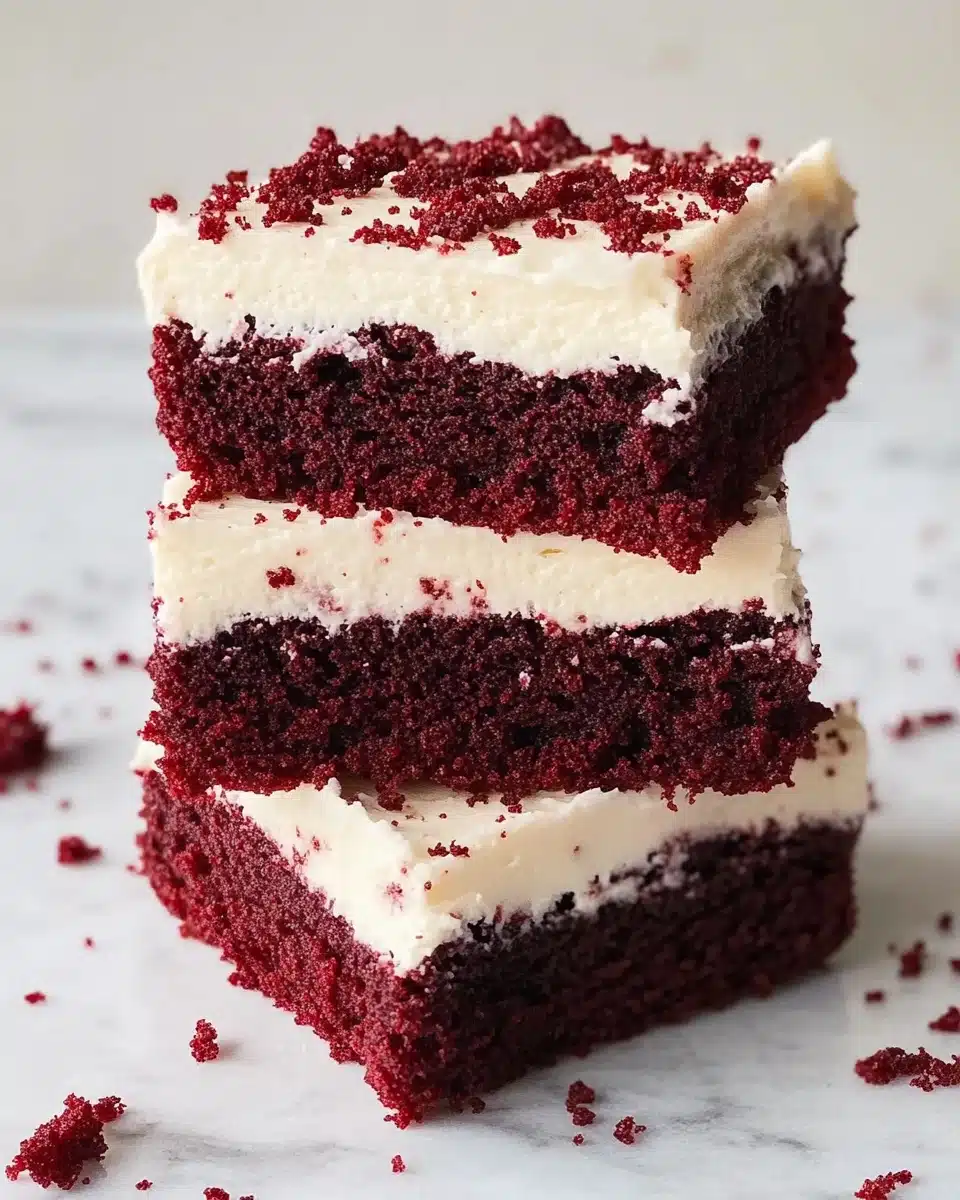
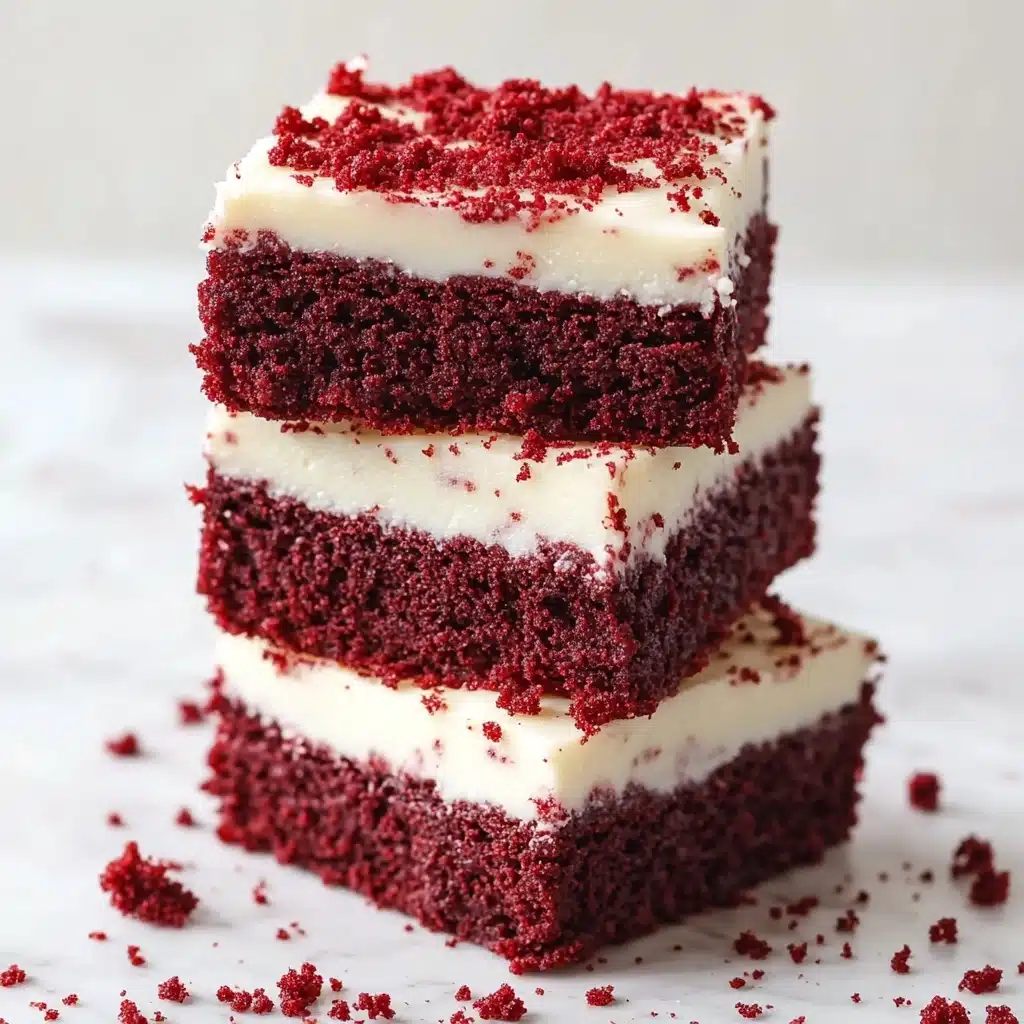
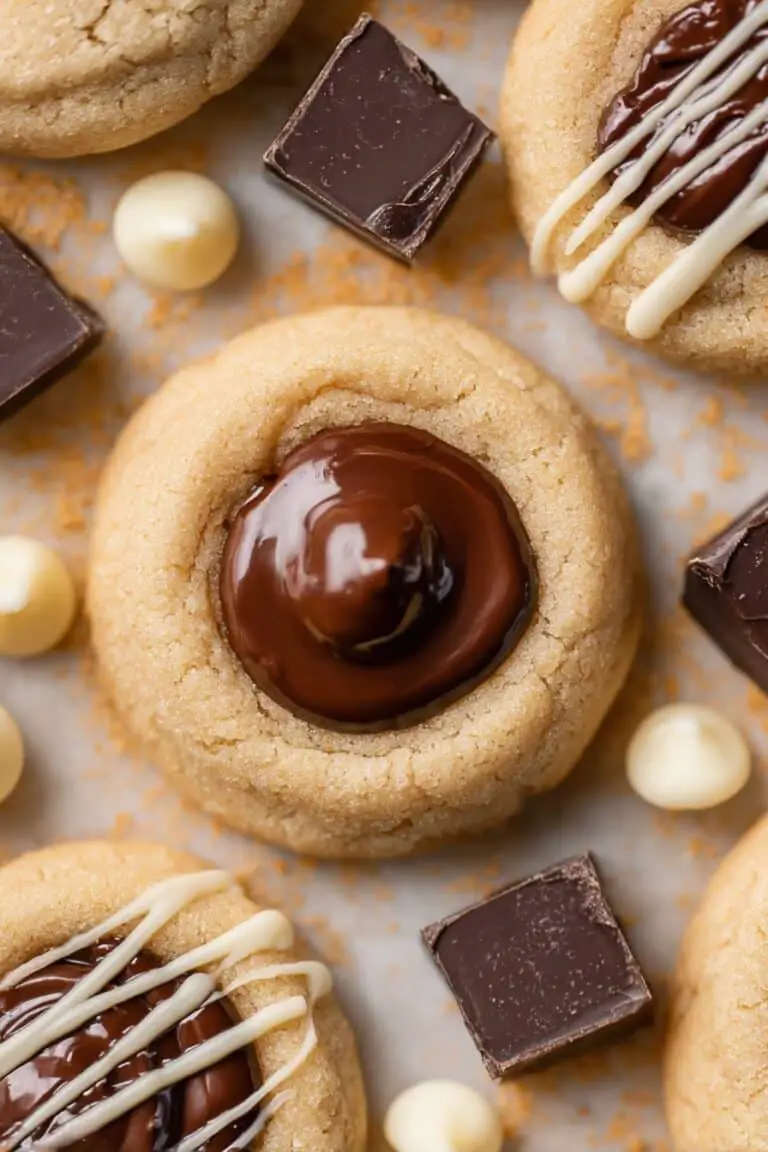
If you’re crazy about that signature cocoa-vanilla tang and plush, fudgy texture, these Red Velvet Brownies are about to steal your heart! They’re everything you love about classic red velvet cake—but baked in a thick, decadent bar form, complete with a swoop of creamy, dreamy cream cheese frosting on top. Every bite is a celebration, and believe me: you’ll want to share (or maybe not!) every last crumb.
Why You’ll Love This Recipe
- Supremely Fudgy Texture: These brownies bake up thick and chewy with that crave-worthy fudge factor—never dry or cakey.
- True Red Velvet Flavor: The perfect balance of cocoa, vanilla, and a subtle tangy note makes every bite taste like your favorite red velvet cake, only better.
- Easy, Everyday Ingredients: You’ll find almost everything you need in your pantry—nothing fancy or hard to track down.
- Irresistible Cream Cheese Frosting: The sweet-tangy layer of frosting is outrageously creamy, making these brownies feel extra special.

Ingredients You’ll Need
Let’s talk shop: every ingredient in these Red Velvet Brownies serves a delicious purpose. From the splash of vinegar and cocoa for that classic tang, to the dreamy cream cheese frosting on top, this list keeps things simple so each bite is perfectly rich, smooth, and unforgettable.
- Unsalted Butter: Creates a rich base and keeps the brownies ultra-moist. Melting it ensures a shiny, dense crumb.
- Granulated Sugar & Light Brown Sugar: A mix for depth of sweetness and a lovely hint of caramel flavor.
- Large Eggs + Egg Yolk: Add structure and unbeatable richness; the extra yolk makes everything just a bit more decadent.
- Vanilla Extract: Essential for that true red velvet flavor—don’t skimp!
- Vegetable Oil: The key to fudgy, chewy brownies rather than cake-like bars.
- Cocoa Powder: Use unsweetened—this gives our brownies their signature, gentle chocolate undertone.
- All-purpose Flour: Just enough to hold things together without making the brownies dry.
- Vinegar: Classic in red velvet, this reacts with the cocoa and boosts the cake’s tang (don’t worry, you won’t taste it directly).
- Cornstarch: Makes the crumb silky-smooth and gives the brownies their signature soft bite.
- Salt: Enhances every other flavor—trust me, you’ll taste the difference.
- Red Food Coloring: Gel or liquid—whatever you use, this ensures that unmistakable, gorgeous red hue.
- White Chocolate Chips (optional): For little puddles of creamy sweetness throughout every bite.
- Cream Cheese & Unsalted Butter (for the frosting): The backbone of a tangy, fluffy whipped topping.
- Powdered Sugar: Sweetens and thickens the frosting—don’t skip sifting for luscious results!
Variations
Red Velvet Brownies are wonderfully easy to adapt no matter what you have on hand or how you want to personalize them. Don’t be afraid to play with the flavor, color, or toppings—these brownies are as flexible as they are delicious!
- Gluten-Free: Swap the all-purpose flour for a high-quality gluten-free flour blend—just be sure it includes xanthan gum for best texture.
- Chocolate Swirl: Drizzle melted bittersweet or semisweet chocolate over the frosting for a visually stunning finish and extra richness.
- Nuts or Chocolate Chunks: Gently fold in toasted pecans, walnuts, or your favorite chocolate chunks for a bit of crunch and new texture.
- Berry Boost: Scatter fresh raspberries on top of the batter before baking for juicy pops of flavor and color.
How to Make Red Velvet Brownies
Step 1: Prep Your Baking Pan and Oven
Start by lining a 9-inch square cake pan with parchment paper (this will save you so much mess later) and preheat your oven to 350°F (180°C). If using a fan-assisted oven, set it to 160°C. Having everything ready ensures even baking and easy removal after your brownies have cooled.
Step 2: Melt the Butter and Combine Sugars
Melt your unsalted butter in short bursts in the microwave until liquid but not hot. Then, in a large bowl, whisk it together with the granulated and brown sugars. This combo creates a rich, caramel-like foundation for your Red Velvet Brownies.
Step 3: Mix in Eggs, Vanilla, and Oil
Add the eggs, extra yolk, and vanilla extract. Whisk gently—this isn’t about whipping air in; we’re going for dense, chewy brownies here. Next, drizzle in the vegetable oil and cocoa powder, combining it all until you have a smooth, silken batter.
Step 4: Color That Batter Red
Spoon a small portion of batter into a separate bowl, stir in the red food coloring until you see nothing but vibrant, even color, then pour this back into your main bowl and gently stir. This extra step keeps the color bright and evenly distributed—no streaks!
Step 5: Fold in Dry Ingredients
Switch to a spatula or wooden spoon and gently fold in the flour, cornstarch, and salt. Mix just until you don’t see any white streaks—overmixing can make them tough. Next, stir in the vinegar for that signature red velvet tang and, if you like, add white chocolate chips.
Step 6: Bake and Cool
Scrape the batter into your prepared pan, smoothing the top. Bake for 20–25 minutes, watching for a skewer with a few damp crumbs (not raw batter!) when tested. Let the brownies cool completely in the pan—this makes them easier to frost and slice.
Step 7: Make and Spread the Cream Cheese Frosting
Blend the room-temp cream cheese and butter until smooth and fluffy. Gradually add the powdered sugar (start slow—no powdered sugar clouds!), then beat in vanilla until spreadable and creamy. Once brownies are cool, lavishly spread with frosting and slice into squares.
Pro Tips for Making Red Velvet Brownies
- Scale It Right: For that signature fudgy texture, use a kitchen scale to ensure your measurements are spot-on—too much flour and you’ll lose that gooey middle!
- Room Temperature Ingredients: Make sure your eggs, cream cheese, and butter are at room temp—this guarantees a smooth, lump-free batter and frosting.
- Don’t Overmix: For the classic dense crumb, stir dry ingredients in gently and stop as soon as the flour disappears.
- Judge by Crumbs, Not Timing: Start checking the brownies a few minutes early; you’re aiming for moist crumbs on your skewer, not a dry, clean stick.
How to Serve Red Velvet Brownies
Garnishes
The red-and-white combo looks showstopping on its own, but don’t be shy about adding a final flourish! Try a sprinkling of red velvet cake crumbs, white chocolate curls, or even a light dusting of cocoa powder for an elegant touch on your Red Velvet Brownies. Fresh berries are always lovely, too.
Side Dishes
These brownies are pure indulgence solo, but a scoop of vanilla bean ice cream or a dollop of whipped cream on the side is downright swoon-worthy. For a fancy brunch, serve alongside hot coffee or a cappuccino to balance out the sweetness.
Creative Ways to Present
Cut your Red Velvet Brownies into tiny bites for party trays, or layer in dessert parfaits with more frosting and berries. For special occasions, use cookie cutters to make heart or star shapes—everyone loves a pretty brownie!
Make Ahead and Storage
Storing Leftovers
Store leftover Red Velvet Brownies in an airtight container in the refrigerator, thanks to the cream cheese frosting. They’ll keep their just-baked texture and flavor for up to five days—perfect for snacking all week!
Freezing
To freeze, simply wrap brownies tightly (preferably un-frosted) in plastic wrap, then in foil. They’ll stay fresh for up to three months. When you’re ready for a treat, thaw overnight in the fridge, then frost right before serving.
Reheating
If you love a gooey, slightly warm brownie, pop a piece in the microwave for just 10–15 seconds—just be careful with the frosting! This brings those incredible red velvet flavors back to life.
FAQs
-
Why does this recipe use both butter and oil?
Butter lends richness and flavor, while vegetable oil ensures the brownies are extra fudgy and moist—it’s the best of both worlds and what keeps these Red Velvet Brownies from ever being dry or cakey!
-
Can I make these brownies ahead of time?
Absolutely! You can bake the brownies a day ahead and frost them before serving. In fact, letting them sit overnight (covered, in the fridge) often enhances their flavor and makes slicing even easier.
-
Is the food coloring necessary for flavor?
No, the red food coloring is only for that classic red velvet look. The flavor profile comes from the cocoa, vanilla, and vinegar, so you can omit the coloring for a “natural” version if you prefer.
-
What’s the best way to get clean slices with frosted brownies?
The secret is a super sharp knife wiped clean between cuts. For extra clean lines, pop the frosted brownies in the fridge for 30 minutes before slicing—this firms everything up and gives you perfect bakery-worthy squares.
Final Thoughts
Trust me—once you invite Red Velvet Brownies into your baking rotation, they’ll make every occasion feel like a party. If you’re looking for the ultimate way to share some love (or just treat yourself), this is your go-to recipe. Give them a try, and don’t be surprised when everyone asks for seconds!
Print
Red Velvet Brownies Recipe
- Prep Time: 10 minutes
- Cook Time: 30 minutes
- Total Time: 40 minutes
- Yield: 16 brownies
- Category: Dessert
- Method: Baking
- Cuisine: American
- Diet: Vegetarian
Description
Indulge in these decadent Red Velvet Brownies topped with a creamy cream cheese frosting. Rich, moist, and irresistible!
Ingredients
For the Red Velvet Brownies
- 3/4 stick Unsalted Butter (85g)
- 1 cup Granulated Sugar (200g)
- 1/4 cup Light Brown Sugar (55g)
- 3 Large Eggs
- 1 large Egg Yolk
- 1 teaspoon Vanilla Extract
- 1/3 cup Vegetable Oil (72g / 80ml)
- 1/4 cup Cocoa Powder (25g)
- 3/4 cup All-purpose Flour (90g)
- 1 tablespoon Vinegar
- 1 tablespoon Cornstarch
- 1/4 teaspoon Salt
- 1/2 teaspoon Red Food Coloring
- 3/4 cup White Chocolate Chips (optional)
For the Cream Cheese Frosting
- 4 oz Cream Cheese (114g)
- 3/4 stick Unsalted Butter (85g)
- 4 cups Powdered Sugar (480g)
- 1 teaspoon Vanilla Extract
Instructions
- Make the Red Velvet Brownies – Line a 9-inch square cake pan with parchment paper and preheat the oven to 350°F / 180°C (160°C fan assisted). Melt butter in the microwave. Combine sugars with melted butter, then add eggs and vanilla. Mix in oil and cocoa powder. Incorporate red food coloring. Fold in dry ingredients and vinegar. Optionally add white chocolate chips. Bake for 20-25 minutes. Let cool.
- Make the Cream Cheese Frosting – Beat butter and cream cheese until smooth. Slowly mix in powdered sugar, then beat on high until fluffy. Add vanilla.
Notes
- I recommend weighing ingredients for accuracy and consistent results. Small measurement changes can impact texture significantly. Use a scale if possible for best results.
Nutrition
- Serving Size: 1 brownie
- Calories: 280
- Sugar: 30g
- Sodium: 160mg
- Fat: 14g
- Saturated Fat: 8g
- Unsaturated Fat: 5g
- Trans Fat: 0g
- Carbohydrates: 36g
- Fiber: 1g
- Protein: 3g
- Cholesterol: 65mg


